Lightweight backend modules
Introduction
Shopware 5.1 comes with an useful feature which is specially interesting for developers who would love to create a backend module for their plugin, but don't want to deal with the steep learning curve of ExtJS. In the following article you'll get to know this new technology.
Concept
The basic idea behind the lightweight backend modules is quite simple: we want to allow third party developers to create simple backend modules in a breeze. Therefore, we want to come up with a solution which allows creating the modules using vanilla HTML, CSS and JavaScript, without the headache of learning ExtJS.
This means we have to encapsulate the module from the rest of the Shopware backend, using an iframe element, which includes the module content.
Due to the fact that the iframe element is basically a website in another website, we had to find a way to communicate with the iframe and, on the other hand, the iframe needs a way to communicate with the backend as well.
HTML5's cross document messaging
In the HTML5 Web Messaging Draft a new API called Window.postMessage() was introduced, which safely enables cross-origin communication using a defined message bus. It gives the recipient of a message a reliable way to know its real origin. The current HTML5 specification allows the payload to be either a string or a JavaScript object. In either case, there's no message structure semantics built into the specification, which means there's no standard way to handle the message's payload and process the message.
Message structure
We're using the Window.postMessage API for the inter-process communication between module content and the rest of the backend. We overcome the missing message structure with another established standard protocol named JSON-RPC 2.0. It is a stateless, lightweight remote procedure call protocol encoded in JSON. The general mechanism consists of two peers establishing a data connection. During the lifetime of a connection, peers may invoke methods provided by the other peer.
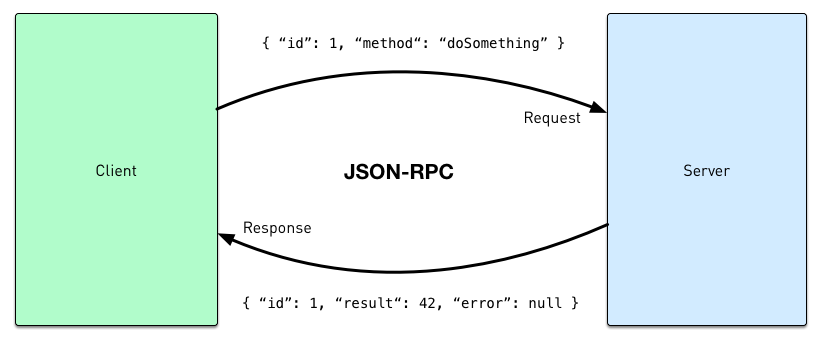
JSON-RPC scheme
The communication layer
As mentioned above, we're using JSON-RPC 2.0 for the communication. We extended the specification with several modifications to support our use case. A RPC call is represented by sending a Request object to a Server, with the following content by default.
{
    "jsonrpc": "2.0",
    "method": "substract",
    "params": [42, 23],
    "id": 1
}
Our modification of the Request objects contains additional information about the module (instance) and window (component) which sent the Request to Server. The target member defines the Shopware modules containing the method which should be called. Due to the asynchronous nature of JavaScript, the Request object contains an async member. The member defines that the result isn't available immediately after the method is called, but rather once the callback of the called method is invoked.
{
    "jsonrpc": "2.0",
    "method": "createSubWindow",
    "params": { "name": "Custom window" },
    "target": "Shopware.ModuleManager",
    "component": "main",
    "instance": "550e8400-e29b-11d4-a716-446655440000",
    "async": true,
    "id": 1
}
The Response object contains the result of the called method and has the following members:
{
    "jsonrpc": "2.0",
    "result": { "some": "data" },
    "error": null,
    "component": "main",
    "instance": "550e8400-e29b-11d4-a716-446655440000",
    "id": 1
}
A response will always be sent from the Server to the Client which sent the Request object. The result member can be null if an error occurred on the Server and the value of this member should have been determined by the method invoked on the Server. Please keep in mind that the entire inter-process communication is asynchronous, therefore the processing of the Response object has to be handled in a callback method.
How to create a simple backend module?
Creating a new backend module using the lightweight backend module is super easy. Basically you just have to create a new menu entry in the Shopware administration and register a backend controller to get it working. Let's start with the menu entry.
<?xml version="1.0" encoding="utf-8"?>
<menu xmlns:xsi="http://www.w3.org/2001/XMLSchema-instance"
      xsi:noNamespaceSchemaLocation="https://raw.githubusercontent.com/shopware5/shopware/5.3/engine/Shopware/Components/Plugin/schema/menu.xsd"
>
    <entries>
        <entry>
            <name>SwagLightweightModule</name>
            <label lang="en">SwagLightweightModule</label>
            <label lang="de">SwagLightweightModule</label>
            <controller>ExampleModulePlainHtml</controller>
            <action>index</action>
            <class>sprite-application-block</class>
            <parent identifiedBy="controller">Marketing</parent>
            <onclick>Shopware.ModuleManager.createSimplifiedModule("ExampleModulePlainHtml", { "title": "Lightweight Backend Module" })</onclick>
        </entry>
    </entries>
</menu>
Please note that we call the createSimplifiedModule() JavaScript method in the onclick property of the menu entry, which means that, when the user clicks on the menu entry, the onclick method will be called and the backend module will be create. The first argument of the createSimplifiedModule() is the name of the backend controller and the second argument is an object to customize the appearance of the window. You can set the title, width and / or height of the window.
Now we can implement the controller. Please note we already registered our template directory in the onGetBackendController() event handler method.
The minimum requirement for the controller is that it extends from Enlight_Controller_Action and has the indexAction method implemented. The actual function body of the method can be left empty.
class Shopware_Controllers_Backend_ExampleModulePlainHtml extends Enlight_Controller_Action {
    public function indexAction() {

    }
}
Layout your module
Now let's start templating our backend module. We recommend using Bootstrap as the frontend framework.
First let's take a look on the directory structure in the Views/backend directory of our plugin:
|-- _base
|   `-- layout.tpl
|-- _resources
|   |-- css
|   |   |-- bootstrap-theme.min.css
|   |   `-- bootstrap.min.css
|   |-- fonts
|   `-- js
|       |-- bootstrap.min.js
|       `-- jquery-2.1.4.min.js
`-- example_module_plain_html
    `-- index.tpl
As you can see there's a file called _base/layout.tpl. It's best practice to create a basic layout file which contains the HTML head and the necessary structure for you module. The block system of Smarty from the storefront is also available in your backend module, therefore it's recommend to create your own Smarty blocks in the _base/layout.tpl. Here's an example:
<!DOCTYPE html>
<html lang="en">
<head>
    <meta charset="utf-8">
    <meta name="viewport" content="width=device-width, initial-scale=1">
    <link rel="stylesheet" href="{link file="backend/_resources/css/bootstrap.min.css"}">

    {block name="content/header_tags"}{/block}
</head>
<body role="document" style="padding-top: 80px">

<!-- Fixed navbar -->
<nav class="navbar navbar-inverse navbar-fixed-top">
    {block name="content/navigation"}{/block}
</nav>

<div class="container theme-showcase" role="main">
    {block name="content/main"}{/block}
</div> <!-- /container -->

<script type="text/javascript" src="{link file="backend/base/frame/postmessage-api.js"}"></script>
<script type="text/javascript" src="{link file="backend/_resources/js/jquery-2.1.4.min.js"}"></script>
<script type="text/javascript" src="{link file="backend/_resources/js/bootstrap.min.js"}"></script>
{block name="content/javascript"}{/block}
</body>
</html>
The only requirement is to import backend/base/frame/postmessage-api.js. This file provides the postMessage API, which initializes itself and connects to the Shopware backend.
postMessage API
Our postMessage API is event-driven and uses an observer pattern to provide an easy way to extend its native functionality. Every method fires an event, which can be used to hook your own logic into the API. One of the most important events is the initialized-api, which lets you know that the API is ready for further usage. Here's an example of how to use events:
var subscription = window.events.subscribe('initialized-api', function(obj) {
    // Do something now that the event has occurred
});

// ...sometime later where I no longer want subscription...
subscription.remove();
Here's a entire list of all available events:
- send-rpc-request-object
- initialized-api
- get-post-message
- open-module
- open-subwindow
- send-message-to-subwindow
- create-growl-message
- create-confirm-message
- create-prompt-message
- create-alert-message
- set-title
- component/get-width
- component/set-width
- component/get-height
- component/set-height
- component/show
- component/hide
- component/destroy
- component/minimize
- component/maximize
- component/restore
- component/toggle-maximize
- component/set-body-style
Demo plugin
A demo plugin which highlights the new functionality can be found on GitHub.
API documentation
You can find the API documentation of the our postMessage API here.