Theme.php
Introduction
The Theme.php is the base file of each Shopware theme. It contains the basic information like the name, author, description and the license, which are displayed in the Theme Manager:
<?php
namespace Shopware\Themes\Example;

use Doctrine\Common\Collections\ArrayCollection;
use Shopware\Components\Form as Form;
use Shopware\Components\Theme\ConfigSet;

class Theme extends \Shopware\Components\Theme
{
    /** @var string Defines the parent theme */
    protected $extend = 'Responsive';

    /** @var string Defines the human readable name */
    protected $name = 'Example';

    /** @var string Description of the theme */
    protected $description = 'An example theme';

    /** @var string The author of the theme */
    protected $author = 'shopware AG';

    /** @var string License of the theme */
    protected $license = 'MIT';
}
The Theme.php can also contain the theme's custom configuration and included files like JavaScript or CSS. In this guide you will learn how to customize your own theme's configuration and how to deal with additional files.
Adding JavaScript and CSS
Working with compressors isn't always as easy as adding the files to your HTML structure using script tags. The built-in JavaScript compressor is as easy as this, and perfectly suited your workflow as a web developer.
Adding JavaScript
Simply place your JavaScript files in the frontend/_public directory and add their paths to the $javascript array in your Theme.php:
/** @var array Defines the files which should be compiled by the javascript compressor */
protected $javascript = array(
    'src/js/jquery.my-plugin.js'
);
Adding CSS
You can add a $css array to your Theme.php file, similar to the $javascript array, with the paths of your CSS files:
/** @var array Defines the files which should be compiled by the javascript compressor */
protected $css = array(
    'src/css/my-styles.css'
);
Discard JavaScript/CSS from other Themes
When you want to develop a completely new theme, it might be a good idea to discard the styling defined by the Shopware Responsive theme.
You can do so by adding the following code to your Theme.php:
protected $discardedLessThemes = [\Shopware\Themes\Responsive\Theme::class];
It's also possible to discard Javascript files:
protected $discardedJavascriptThemes = [\Shopware\Themes\Responsive\Theme::class];
To have an unique identifier, you have to use the full class name of the Theme, you would like to discard. You get this by navigating to the theme folder located at themes/{the-theme-name}/ and opening the Theme.php. Locate the namespace at the top of the file.
For the Bare theme the namespace looks like this:
namespace Shopware\Themes\Bare;
Add the name of the class (always Theme) to it to get the complete name.
You will have to use:
\Shopware\Themes\Bare\Theme::class
in your own Theme.php if you want to discard the Less or JavaScript of the Bare theme.
Of course you can discard multiple themes. You have to recompile the themes after changing these two configuration options.
Customizing the theme configuration
It's possible to add custom configuration options to your theme. Using this method, the user can fully customize the theme without having to edit any CSS files.
To create configuration elements it's necessary to add a createConfig() method to your Theme.php. This method specifies the elements you need for the configuration form. The first parameter is the container element of type Shopware\Components\Form\Container\TabContainer where you can add additional fields as well as other container elements:
/**
 * @param Form\Container\TabContainer $container
 */
public function createConfig(Form\Container\TabContainer $container)
{
    $tab = $this->createTab(
        'my_custom_tab',
        'My custom tab'
    );

    $container->addTab($tab);
}
Container elements
The $container also accepts other container elements like a tab or a fieldset:
/**
 * @param Form\Container\TabContainer $container
 */
public function createConfig(Form\Container\TabContainer $container)
{
    $fieldset = $this->createFieldSet(
        'my_custom_settings',
        'My custom settings'
    );

    $tab = $this->createTab(
        'my_custom_tab',
        'My custom tab'
    );

    $tab->addElement($fieldset);

    $container->addTab($tab);
}
Adding elements to the configuration container
Now you can add the necessary elements to the $container. The following elements are available:
createTextFieldcreateNumberFieldcreateCheckboxFieldcreateDateFieldcreateEmFieldcreateColorPickerFieldcreateMediaFieldcreatePercentFieldcreatePixelFieldcreateSelectFieldcreateTextAreaField
All elements have a similar syntax:
$this->createTextField([unique name], [label], [default value]);
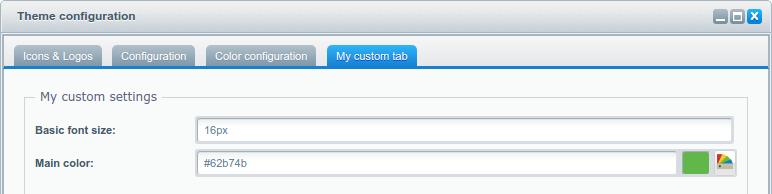
In the following example, we create a text and a color picker fields. The name of any field is mandatory and has to be unique. It will be used to assign the value of the field to the storefront:
/**
 * @param Form\Container\TabContainer $container
 */
public function createConfig(Form\Container\TabContainer $container)
{
    // Create the fieldset which is the container of our field
    $fieldset = $this->createFieldSet(
        'my_custom_settings',
        'My custom settings'
    );

    // Create the textfield
    $textField = $this->createTextField(
        'basic_font_size',
        'Basic font size',
        '16px'
    );

    // Create the color picker field
    $colorPickerField = $this->createColorPickerField(
        'custom-color-main',
        'Main color',
        '#62b74b'
    );

    // Adding the fields to the fieldset
    $fieldset->addElement($textField);
    $fieldset->addElement($colorPickerField);

    // Create the tab which will be named "My custom colors"
    $tab = $this->createTab(
        'my_custom_tab',
        'My custom tab'
    );

    // ...add the fieldset to the tab
    $tab->addElement($fieldset);

    // ...last but not least add the tab to the container, which is a tab panel.
    $container->addTab($tab);
}
After saving the Theme.php, you will be able to see your new settings inside the additional tab "My custom tab":
Now you can use the value of the fields inside the template files of the storefront:
{$theme.basic_font_size}
The field values are also automatically available inside your LESS files. You can use them by inserting a variable which has the unique name of the configuration field:
@custom-color-main;
Further customization
Helper methods like createTab() or createFieldSet() automatically create ExtJs components for you, so that you don't have to write any JavaScript code when creating your theme configuration. The createFieldSet() method accepts a third optional parameter which is an attributes array. This array can contain several ExtJs properties which can customize a field set.
This attributes array creates a two-column layout for the field set from the previous example:
$fieldset = $this->createFieldSet(
    'my_custom_settings',
    'My custom settings',
    array(
        'attributes' => array(
            'layout' => 'column',
            'flex' => 0,
            'defaults' => array(
                'columnWidth' => 0.5,
                'labelWidth' => 180,
                'margin' => '2 15 2 0'
            )
        )
    )
);
Creating a blank theme configuration
It is also possible to create a completely blank theme configuration. To prevent your theme configuration from showing the parent theme configuration you can add the $inheritanceConfig variable to your Theme.php:
protected $inheritanceConfig = false;
As you can see, the "My custom tab" is the only one which is displayed inside the theme configuration:
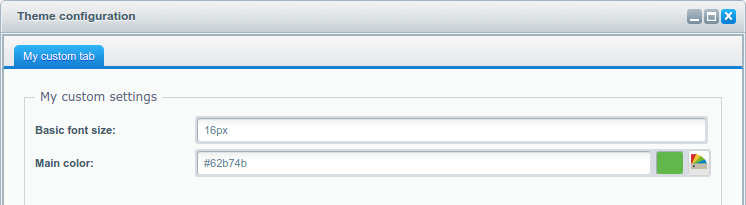
Now you can either override the default unique names like e.g. brand-primary or create your own.
Theme.php will use the default value of your parent theme.
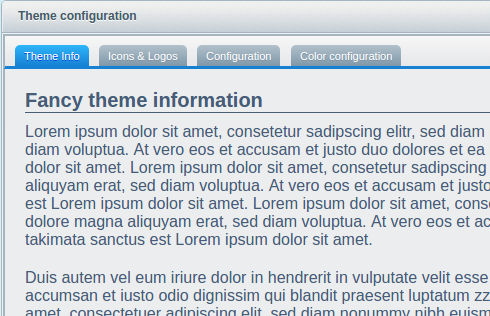
Create a theme info tab
In order to create a new tab containing information about your theme, create a new sub-directory in your theme directory called info. Add HTML files named like the language ISO you want support.
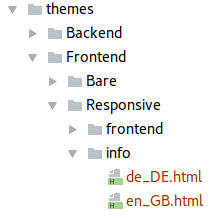
If the current backend language ISO is not found, Shopware uses the fallback en_GB.html.
Use HTML and CSS in your file to style and describe the information as you want.
<style type="text/css">
    .yourBodyContainer {
        ...
    }
</style>

<div class="yourBodyContainer">
    ...
</div>
Configuration sets
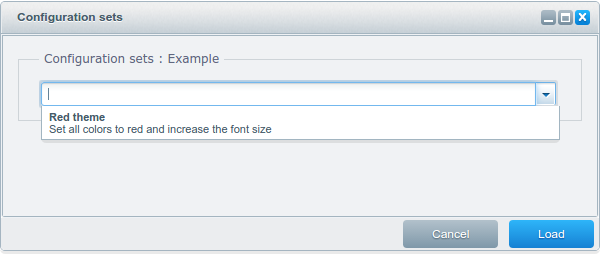
With every theme configuration you have the ability to create custom configuration sets. Inside those configuration sets you can apply a specific value to each configuration field using the setValues() method. In this example the color field gets a hex value for red and the font size field gets an increased value of 20px:
public function createConfigSets(ArrayCollection $collection)
{
    $set = new ConfigSet();
    $set->setName('Red theme');
    $set->setDescription('Set all colors to red and increase the font size');
    $set->setValues(array(
        'basic_font_size' => '20px',
        'custom-color-main' => '#ff0000'
    ));

    $collection->add($set);
}
After saving the Theme.php you should see your configuration set inside the configuration sets window: