Shopware HTTP cache
Caching is a common approach to improve the scalability of a system. For that reason, Shopware provides a build in HTTP cache, that should be enabled in production systems. This document will handle some basics regarding configuration and debugging of the HTTP cache.
Configuring the cache
The cache configuration consists of two parts: The backend configuration, which will allow
you to modify the caching behaviour from within Shopware, and the base configuration, which is
configured in your config.php file.
Backend
The cache configuration module can be found in Settings->Caches / Performance->Settings->Http-Cache.
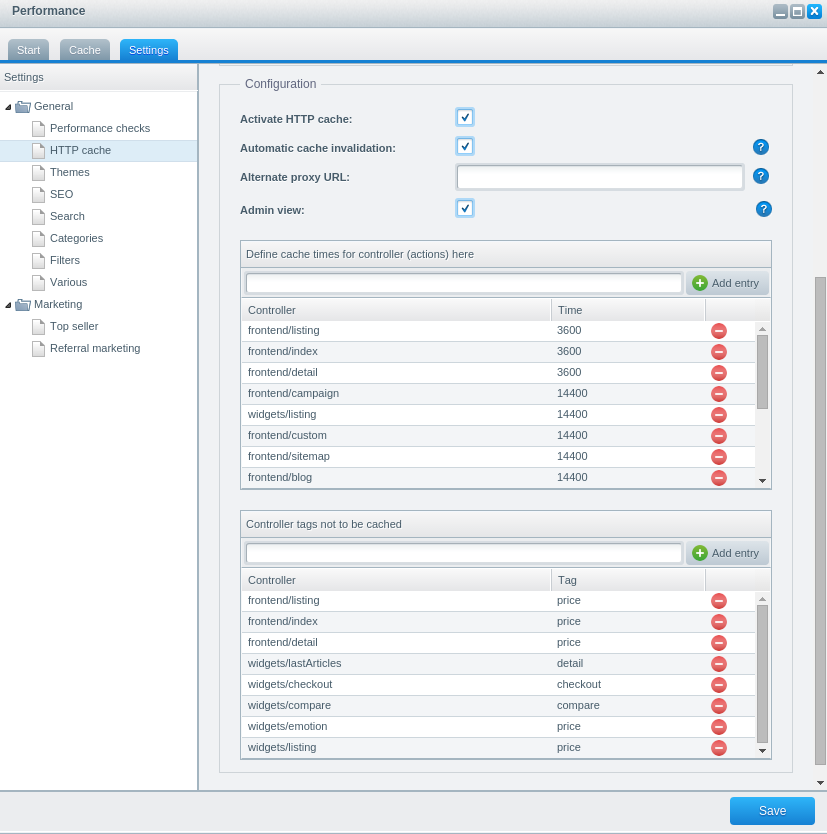
It mainly has the following configuration options:
- Activate HTTP Cache: Turn the HTTP caching on or off
- Automatic cache invalidation: If an item X is changed, clear the caches for pages which contain X. This is highly recommended, as this will allow you to have full cached pages AND almost instant cache updates, if e.g. the price of an item changes.
- Alternate proxy URL: When not using Shopware built in cache, enter the IP of your cache here. This will allow you to invalidate / clear your remote cache from within Shopware. If you use Nginx without Varnish, you have to add the URL to Shopware here with a custom URL path, because Nginx does not allow BAN requests on "/". Example: http://example.com/ban
- Admin view: Do not cache frontend pages if you are signed in as an admin.
- Cache controller times: Which
controller should be cached for how long? The
Controllercolumn contains the controller's module + the controller's name. Thetimecolumn the caching time in seconds (TTL). Only controllers / pages in this will be cached at all. - Controller tags not to be cached: Do
not cache these controllers if the user session has a certain state. The rule of thumb is: if a user is logged in, the
pricetag is active, if some items are in the cart, thecheckouttag is active. So, as you can see, Shopware will not cache listing pages of logged in users - they might have different prices. See the link before for more details.
Config
As always, the basic config definition can be found in engine/Shopware/Configs/Default.php.
Here you'll find the basic definitions, which can be overridden from your config.php file.
Depending on your Shopware version, it will look like this:
'httpcache' => [
    'enabled' => true,
    'cache_dir' => $this->getCacheDir().'/html',
    'cache_cookies' => ['shop', 'currency', 'x-cache-context-hash'],
    'debug' => false,
    'default_ttl' => 0,
    'private_headers' => ['Authorization', 'Cookie'],
    'allow_reload' => false,
    'allow_revalidate' => false,
    'stale_while_revalidate' => 2,
    'stale_if_error' => false
]
Some of the fields are Shopware specific:
enabled: If you want to use Shopware's builtin cache (a.k.areverse proxy), this needs to be set totrue. If you are using a Varnish cache, you need to set this config tofalse.cache_dir: The cache files will be stored in this directory.cache_cookies: The content of these cookies is taken into account in the cacheID - so e.g. there will be a different cache for "shop=1" and "shop=2". We will discuss this in depth later.
The other fields will influence the underlying Symfony HTTP cache component, so these config values are described in the Symfony HTTP cache documentation. Just as an overview:
debug: Will set some additional debugging info in the cache's responses. This will be explained later in this documentdefault_ttl: How long is a page considered to be fresh before the cache will try to get a fresh result? Usually this config is overridden by the TTL definition you made in the backend module.private_headers: A list of headers that will make the cache not cache the result. By default pages with Authorisation headers and "set cookie" responses will not be cachedallow_reload: Will allow a client to bypass the cache by providing specific headers.allow_revalidate: Will allow a client to bypass the cache by setting another header.stale_while_revalidateandstale_if_errorwill allow the cache to request fresh pages in certain conditions
Debugging the cache
The internal behaviour of the cache is usually not exposed to the end user. So it's hard to tell if ESI subrequests came live from the server or if the page has been cached at all.
The debug flag
Setting the debug flag in your config.php will expose this info for debugging purposes:
'httpcache' => [
    'debug' => true,
],
After clearing the shop's cache, open the developer toolbar of your browser and look at the document's response headers:
X-Content-Digest:en1dac22cb10b9a66cb6590a7819384d54fcb637e838f65c40b655b07c85cd5f7d
X-Shopware-Allow-Nocache:price-1
X-Shopware-Cache-Id:;c3;
X-Symfony-Cache: GET /: miss, store;
    GET /?action=shopMenu&controller=index&module=widgets: fresh;
    GET /?controller=compare&module=widgets: miss, store;
    GET /?action=menu&controller=index&group=gLeft&module=widgets: miss, store;
    GET /?action=info&controller=checkout&module=widgets: miss, store
The X-Content-Digest header gives you information of the cached file - you could actually inspect the file by opening
/your/doc/root/var/cache/production____REVISION___/html/en/1d/ac/22cb10b9a66cb6590a7819384d54fcb637e838f65c40b655b07c85cd5f7d.
So the first 6 chars describe the directory, the rest of the content digest is the file name.
X-Shopware-Allow-Nocache will tell which nocache tags the current page reacts to. In the given case,
the index controller was called, which will not be cached if the price tag is active. The suffixed -1 indicates that the current
shop has ID 1.
X-Shopware-Cache-Id contains a list of semicolon separated cache IDs. In this case, c3 indicates that the cache for
this page should be invalidated if the category with ID 3 is changed. See this page
for additional info. The cache ID can be manipulated using the Shopware_Plugins_HttpCache_InvalidateCacheId event
as described here.
X-Symfony-Cache tells you which pages have been requested by the cache. This will be the
main request (/ in this case) as well as all the ESI requests (beginning with /? in this case).
As you can see, there were 4 ESI requests in this case. In addition to that, we can also see which requests hit
the cache (fresh) and which requests had to be requested from Shopware (miss). In the example above, most
requests missed the cache and were fetched from Shopware - but were stored (store) afterwards.
The combination of these headers is quite valuable if you want to improve your cache performance even more, or if you need to debug the cache invalidation behaviour. In addition to that, it tells you how many ESI requests have been made - usually having too many ESI requests will lower your cache performance.
Debugging other headers
There are other headers like Cache-Control, Age or Pragma that might be useful when making assumptions regarding
the cache. These, however, are usually not a good indicator for what actually happened: Shopware uses the Cache-Control header,
for example, to tell the HTTP cache / reverse proxy if it should cache the response. The Symfony HTTP cache, as well
as our Varnish configuration, will modify this header in many cases, in order to prevent other proxies or the user
agent from additionally caching the response. So even if Shopware internally sets the Cache-Control header to a value
like Cache-Control', 'public, max-age=3600, s-maxage=3600 as configured in the cache backend module, the
actual caching instance might still decide to set another header to prevent double cached content.
Similar behaviour is applied to the Age header, which might be stripped by e.g. your web server.
Live caching
Caching and live results are mutually exclusive, of course. But there are several techniques to fetch live results even for cached pages or control the cache IDs in a way that is more suitable for your use case.
Action tag
Shopware's action tag is quite powerful and will work for cached shops as well as for pure live shops. It will
call another controller internally and render that controller's view into the current body. If caching is enabled,
it will render ESI tags, which are also able to bypass the cache for the given controller:
So this snippet
{action controller=listing action=topseller categoryId=3}
in one of your template files will become an ESI tag like this:
<esi:include src="listing/topseller?categoryId=3" alt="" onerror="continue"/>
As mentioned before, ESI tags are a very comfortable way to render live parts or parts with other caching times into a cached template. You shouldn't overuse them, though - this might reduce the performance of your cache.
Javascript
Another very common technique is embedding custom javascript into the page. This will allow you to perform e.g.
Ajax request against an (uncached) controller and gather information this way. This might especially be useful
if you want to e.g. have live in stock values for listing pages - having action tags for every item on the list will
reduce the cache benefit, so having one Ajax call fetching all stock info for the current item list is more performant.
The new Shopware 5 javascript plugin base is described in a separate article.
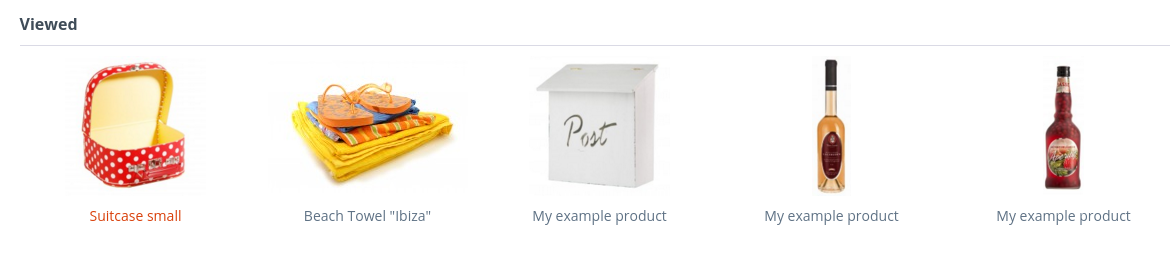
Generally, javascript is an elegant way to deal with full cached pages - a nice example from the Shopware standard is the "last viewed items" functionality: as it is available on many pages (e.g. listing or detail pages), ESI tags were not a good solution as they would still produce much load on the database for almost every page. Using javascript and local storage, we've been able to move this function to the browser entirely.
Cache keys
Another common approach to make the cache aware of pages that might differ depending on certain state, is to include
this state into the URL itself. As the cache uses the request URI as part of the cache key,
we can make the cache aware of e.g. filter options, by adding them to the URL.
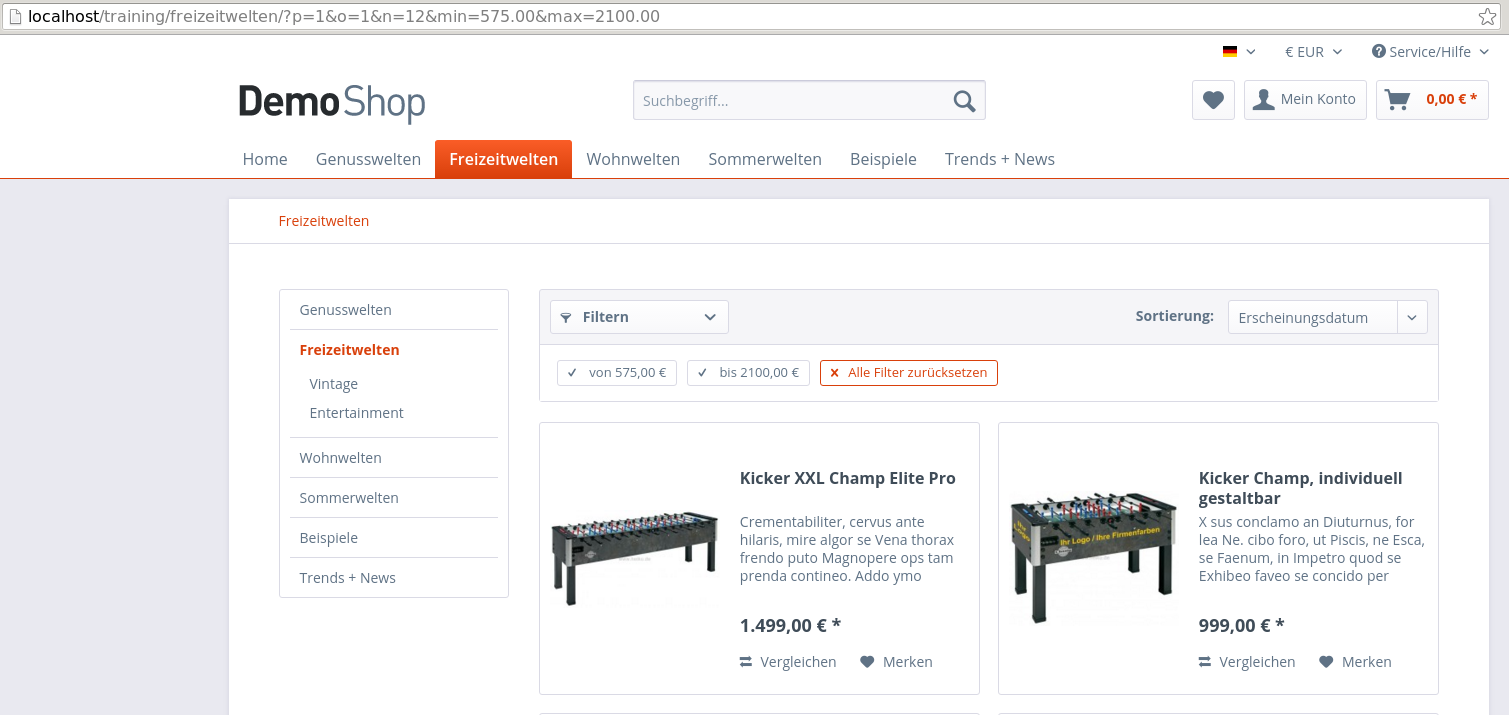 In the screenshot above, you can see how Shopware encodes the current filter selection to the URL - so separate caches are
built for each filter combination. You can mimic this behaviour for own (cached) controllers or extend Shopware's logic for
e.g. the article detail controller to include your custom information in the URL to have separate cache keys for it.
In the screenshot above, you can see how Shopware encodes the current filter selection to the URL - so separate caches are
built for each filter combination. You can mimic this behaviour for own (cached) controllers or extend Shopware's logic for
e.g. the article detail controller to include your custom information in the URL to have separate cache keys for it.
Cache cookie
By default, Shopware does not only use the URL as cache key, but also some cookies - currently shop (for the currently
selected shop), currency (for the currently selected currency) and x-cache-context-hash (which is the hash of the
tax and user group context of the current user).
You can add custom cookies to the list in your config.php to get better control of the cache keys:
'httpcache' => [
    // the other cache options are inherited from Default.php
    'cache_cookies' => ['shop', 'currency', 'x-cache-context-hash', 'my-cache-cookie'],
],
In this case, a cookie named my-cache-cookie was added. If the index page of the shop is called now, nothing has changed,
as the cookie isn't set yet. When the debug flag enabled, the following info will be returned:
X-Symfony-Cache:GET /: fresh;
x-content-digest:en90ac14335786a59216b36f019a6e8cec08475331d3d8c646bce0475c689ba119
So this is a cache hit with the content hash en90ac….
If a cookie is set using the javascript console with the command document.cookie="my-cache-cookie=1" and the page is
reloaded, the following output appears:
X-Symfony-Cache:GET /: miss;
X-Content-Digest:en3ee31beae6fc6f9d54f5c2c5f7b714a604b357c27e44c416e684237a5eecc91b
As you can see, the new content hash en3ee3… differs from the first one. You can reproduce this behaviour again by setting the cookie
to a value 2 - and you will get another cache miss with a new content hash. If the content of the cookie is set back to
1, it will hit the cache again with the prior content hash en3ee3….
Generally this is a quite powerful mechanism to have good control over the cache keys. As always, be aware that the overall target of HTTP caching is to serve as many pages from the cache. The more complex your cache key is, the lower the cache hit rate will become - so think twice before adding new cache keys.
Also, be aware that this approach only applies to Shopware's built-in reverse proxy. If you are using Varnish, you also have to make your Varnish configuration aware of this cookie.
Cluster environments
Another topic that is quite relevant for you, if you are working with bigger environments, is the trustedproxies and purge_allowed_ips configuration.
It does not affect the cache directly, but as soon as you have e.g. a Varnish and a load balancer in play, you will need
to deal with the fact that your IP address is replaced with e.g. the proxy's IP address. This might have effects on
various functions which check for your IP address, e.g. the "maintenance mode", which only allows users with a configured
IP to see the shop. Usually, the proxy will set a header HTTP_X_FORWARDED_FOR which indicates which user originally
triggered the request. Of course, Shopware cannot simply rely on this header, as headers can be spoofed easily.
The trustedproxies configuration defines which clients (proxies) are allowed to set the HTTP_X_FORWARDED_FOR header.
Headers from other IPs are ignored.
If you are running the build-in HTTP shopware cache on your shopware slave servers, you need to whitelist your servers in order to allow the cache to be invalided by this servers. This is set via purge_allowed_ips configuration. You also need to configure an alternative proxy URL in backend settings (Settings > Cache / Performance > Settings > HTTP-Cache). Your slave servers need to be accessible via a distinct URL, e.g. http://fe01.domian.tld, http://fe02.domian.tld.
In order to configure this config, simply change your config.php like this:
<?php

return [
    'db' => [
        // your default db configuration
    ],
    'trustedproxies' => [
        '192.168.0.10', // IP address of load balancer
        '192.168.0.11', // IP address of varnish cache
    ],
    'httpcache' => [
        'purge_allowed_ips' => [
            '192.168.0.101', // IP address of shopware slave 1 @ http://fe01.domian.tld
            '192.168.0.102', // IP address of shopware slave 2 @ http://fe02.domian.tld
        ],
    ],
]
In this case the proxy with the IP 192.168.0.10 is allowed to set the HTTP_X_FORWARDED_FOR header.
Ignore some HTTP parameters
There are certain use cases where a GET parameter has a new value for every request, generating a new entry in the
HTTP cache every time. An example would be the Google Adwords ClickId parameter gclid which contains a new id for
every click that was generated by Google Adwords. This leads to a bad performance for the visitor since existing caches
aren't being used.
Shopware v5.3.5 added the possibility to blacklist parameters like this using the configuration. It provides a list of known parameters that fall in this category but disables them by a block comment. This was done to not change the behaviour of the HTTP cache between patch releases while providing the possibility for shops to easily use this feature.
Starting with Shopware v5.4.0 this list of parameters will be active by default:
'httpcache' => [
    'ignored_url_parameters' => [
/*
           'pk_campaign',    // Piwik
           'piwik_campaign',
           'pk_kwd',
           'piwik_kwd',
           'pk_keyword',
           'pixelId',        // Yahoo
           'kwid',
           'kw',
           'adid',
           'chl',
           'dv',
           'nk',
           'pa',
           'camid',
           'adgid',
           'utm_term',       // Google
           'utm_source',
           'utm_medium',
           'utm_campaign',
           'utm_content',
           'gclid',
           'cx',
           'ie',
           'cof',
           'siteurl',
           '_ga',
*/
    ],
],
More into detail
This document covers general basics of working with Shopware's HTTP cache. There is an addition blog post about the fundamental basics of Shopware's HTTP caching.