Attribute system
The attribute system allows developers and users to configure additional fields for different entities in shopware. Users can simply define new fields over the free text fields backend module.
Developers can define new attributes over the database or use the corresponding service Shopware\Bundle\AttributeBundle\Service\CrudService.
Services
The Shopware\Bundle\AttributeBundle contains the following services:
| Class | Service id | Description |
|---|---|---|
Shopware\Bundle\AttributeBundle\Service\CrudService |
shopware_attribute.crud_service | Allows to change the table schema and persist a backend configuration |
Shopware\Bundle\AttributeBundle\Service\DataLoader |
shopware_attribute.data_loader | Loads the attribute data for a provided table and foreign key |
Shopware\Bundle\AttributeBundle\Service\DataPersister |
shopware_attribute.data_persister | Persists the attribute data for a provided table and foreign key |
Shopware\Bundle\AttributeBundle\Service\SchemaOperator |
shopware_attribute.schema_operator | Handles all schema operations for a provided table |
Shopware\Bundle\AttributeBundle\Service\TableMapping |
shopware_attribute.table_mapping | Contains a mapping of all defined shopware attribute tables, their identifier or core columns and depending tables |
Shopware\Bundle\AttributeBundle\Service\TypeMapping |
shopware_attribute.type_mapping | Contains all defined data types which can be used for table columns |
Attribute data types
The attribute data types are stored in the Shopware\Bundle\AttributeBundle\Service\TypeMapping class. Each type is defined in a unified format and the corresponding sql and elastic search format.
Following types are supported:
| Unified type | SQL type | Backend view |
|---|---|---|
| string | TEXT | Ext.form.field.Text |
| text | TEXT | Ext.form.field.TextArea |
| html | MEDIUMTEXT | Shopware.form.field.TinyMCE |
| integer | INT(11) | Ext.form.field.Number |
| float | DOUBLE | Ext.form.field.Number |
| boolean | INT(1) | Ext.form.field.Checkbox |
| date | DATE | Shopware.apps.Base.view.element.Date |
| datetime | DATETIME | Shopware.apps.Base.view.element.DateTime |
| combobox | MEDIUMTEXT | Ext.form.field.ComboBox |
| single_selection | VARCHAR(500) | Shopware.form.field.SingleSelection |
| multi_selection | MEDIUMTEXT | Shopware.form.field.Grid |
Schema operations and configuration
Create a new attribute
<?php

namespace SwagAttribute;

use Shopware\Components\Plugin;
use Shopware\Components\Plugin\Context\InstallContext;

class SwagAttribute extends Plugin
{
    public function install(InstallContext $context)
    {
        $service = $this->container->get('shopware_attribute.crud_service');
        $service->update('s_articles_attributes', 'my_column', 'string');
    }
}
Creates a new attribute in the database, which is not configurable for the shop user and won't be displayed in the backend.
Update an existing attribute
<?php

namespace SwagAttribute;

use Shopware\Components\Plugin;
use Shopware\Components\Plugin\Context\InstallContext;

class SwagAttribute extends Plugin
{
    public function install(InstallContext $context)
    {
        $service = $this->container->get('shopware_attribute.crud_service');
        $service->update('s_articles_attributes', 'my_column', 'text');
    }
}
Updates the existing my_column attribute with the new provided data type text. In case the attribute doesn't exist, the update function creates the attribute.
Change attribute name
<?php

namespace SwagAttribute;

use Shopware\Components\Plugin;
use Shopware\Components\Plugin\Context\InstallContext;

class SwagAttribute extends Plugin
{
    public function install(InstallContext $context)
    {
        $service = $this->container->get('shopware_attribute.crud_service');
        $service->update('s_articles_attributes', 'my_column', 'text', [], 'my_new_column_name');
    }
}
Set a default value
<?php

namespace SwagAttribute;

use Shopware\Components\Plugin;
use Shopware\Components\Plugin\Context\InstallContext;

class SwagAttribute extends Plugin
{
    public function install(InstallContext $context)
    {
        $service = $this->container->get('shopware_attribute.crud_service');
        $service->update('s_articles_attributes', 'my_integer', 'integer', [], null, false, 3);
    }
}
Creates a new attribute my_integer with the default value 3. Please notice that default values will only be shown in the backend if you're using SW 5.5.4 or higher. In addition to that, please keep in mind that MySQL allows default values for none text/blob columns only.
Delete an existing attribute
<?php

namespace SwagAttribute;

use Shopware\Components\Plugin;
use Shopware\Components\Plugin\Context\UninstallContext;


class SwagAttribute extends Plugin
{
    public function uninstall(UninstallContext $context)
    {
        $service = $this->container->get('shopware_attribute.crud_service');
        $service->delete('s_articles_attributes', 'my_column');
    }
}
Deletes the existing my_column attribute.
Depending tables
Some attribute tables have dependencies to other attribute tables. This dependencies defined in the \Shopware\Bundle\AttributeBundle\Service\TableMapping class.
For example attributes which generated for the s_user_addresses_attributes table, should also generated in s_user_billingaddress_attributes, s_user_shippingaddress_attributes, s_order_billingaddress_attributes, s_order_shippingaddress_attributes.
The update function supports this functionality by providing true for parameter $updateDependingTables.
<?php

namespace SwagAttribute;

use Shopware\Components\Plugin;
use Shopware\Components\Plugin\Context\InstallContext;

class SwagAttribute extends Plugin
{
    public function install(InstallContext $context)
    {
        $service = $this->container->get('shopware_attribute.crud_service');
        $service->update('s_user_addresses_attributes', 'my_column', 'text', [], null, true);
    }
}
Backend view configuration
All above examples only create or update the attribute table schema but won't display the attribute in the corresponding backend module.
The backend view configuration can be configured over the $data parameter which can contain all properties of the \Shopware\Models\Attribute\Configuration.
<?php

namespace SwagAttribute;

use Shopware\Components\Plugin;
use Shopware\Components\Plugin\Context\InstallContext;

class SwagAttribute extends Plugin
{
    public function install(InstallContext $context)
    {
        $service = $this->container->get('shopware_attribute.crud_service');

        $service->update('s_articles_attributes', 'my_column', 'combobox', [
            'label' => 'Field label',
            'supportText' => 'Value under the field',
            'helpText' => 'Value which is displayed inside a help icon tooltip',

            //user has the opportunity to translate the attribute field for each shop
            'translatable' => true,

            //attribute will be displayed in the backend module
            'displayInBackend' => true,

            //in case of multi_selection or single_selection type, article entities can be selected,
            'entity' => 'Shopware\Models\Article\Article',

            //numeric position for the backend view, sorted ascending
            'position' => 100,

            //user can modify the attribute in the free text field module
            'custom' => true,

            //in case of combo box type, defines the selectable values
            'arrayStore' => [
                ['key' => '1', 'value' => 'first value'],
                ['key' => '2', 'value' => 'second value']
            ],
        ]);
    }
}
Rebuild attribute models
Sometimes it's necessary to rebuild the attribute models after attribute creation, update or deletion.
$metaDataCache = Shopware()->Models()->getConfiguration()->getMetadataCacheImpl();
$metaDataCache->deleteAll();
Shopware()->Models()->generateAttributeModels(['s_articles_attributes']);
ExtJS extensions
Shopware.attribute.Form
All attributes are defined, loaded and saved over the Shopware.attribute.Form. It requires only the attribute table and generates all fields dynamically.
The following example shows how to display, load and save customer attributes:
me.attributeForm = Ext.create('Shopware.attribute.Form', {
    table: 's_user_attributes'
});

me.attributeForm.loadAttribute(me.customerRecord.get('id'));

me.attributeForm.saveAttribute(me.customerRecord.get('id'));
Hook into the backend definition
For defining an own backend view for an attribute, it is required to extend the Shopware.attribute.Form. Each attribute type is generated over its corresponding handler class which is defined in the form.
The following example registers an additional handler to modify the backend view of an attribute:
//{block name="backend/base/attribute/form"}

//{$smarty.block.parent}

Ext.define('SwagAttribute.FieldHandler', {
    extend: 'Shopware.attribute.FieldHandlerInterface',

    /**
     * @override
     * @param { Shopware.model.AttributeConfig } attribute
     * @returns { boolean }
     */
    supports: function(attribute) {
        var name = attribute.get('columnName');
        if (attribute.get('tableName') !== 's_articles_attributes') {
            return false;
        }
        return (name === 'my_column');
    },

    /**
     * @override
     * @param { Object } field
     * @param { Shopware.model.AttributeConfig } attribute
     * @returns { object }
     */
    create: function(field, attribute) {
        return Ext.apply(field, {
            xtype: 'textfield',
            emptyText: 'My default value'
        });
    }
});

Ext.define('Shopware.attribute.Form-SwagAttribute', {
    override: 'Shopware.attribute.Form',

    registerTypeHandlers: function() {
        var handlers = this.callParent(arguments);

        return Ext.Array.insert(handlers, 0, [ Ext.create('SwagAttribute.FieldHandler') ]);
    }
});

//{/block}
The supports function is called for each handler until one handler returns true. The create function creates the field definition for the attribute. It is recommended to use Ext.apply(field, { }) to support all core features like translation, help text, support text ...
This extension has to be loaded over the Enlight_Controller_Action_PostDispatch_Backend_Base event.
<?php

namespace SwagAttribute;

use Shopware\Components\Plugin;
use Shopware\Components\Plugin\Context\InstallContext;

class SwagAttribute extends Plugin
{
    public function install(InstallContext $context)
    {
        $service = $this->container->get('shopware_attribute.crud_service');

        $service->update('s_articles_attributes', 'my_column', 'text', [
            'label' => 'Field label',
            'displayInBackend' => true
        ]);

        $context->scheduleClearCache(InstallContext::CACHE_LIST_DEFAULT);
    }

    public static function getSubscribedEvents()
    {
        return [
            'Enlight_Controller_Action_PostDispatch_Backend_Base' => 'extendExtJS'
        ];
    }

    public function extendExtJS(\Enlight_Event_EventArgs $arguments)
    {
        /** @var \Enlight_View_Default $view */
        $view = $arguments->getSubject()->View();

        $view->addTemplateDir($this->getPath() . '/Resources/views/');

        $view->extendsTemplate('backend/swag_attribute/Shopware.attribute.Form.js');
    }
}
Add own backend validation
It is possible to add own validations for each attribute field. In the example above, the my_column attribute is defined over an own field handler.
Following example shows how to apply different validations to an ExtJs field.
//{block name="backend/base/attribute/form"}

//{$smarty.block.parent}

Ext.define('SwagAttribute.FieldHandler', {
    extend: 'Shopware.attribute.FieldHandlerInterface',

    /**
     * @override
     * @param { Shopware.model.AttributeConfig } attribute
     * @returns { boolean }
     */
    supports: function(attribute) {
        var name = attribute.get('columnName');
        if (attribute.get('tableName') !== 's_articles_attributes') {
            return false;
        }
        return (name === 'my_column');
    },

    /**
     * @override
     * @param { Object } field
     * @param { Shopware.model.AttributeConfig } attribute
     * @returns { object }
     */
    create: function(field, attribute) {
        return Ext.apply(field, {
            xtype: 'textfield',
            emptyText: 'My default value',
            allowBlank: false,
            minLength: 10
        });
    }
});

Ext.define('Shopware.attribute.Form-SwagAttribute', {
    override: 'Shopware.attribute.Form',

    registerTypeHandlers: function() {
        var handlers = this.callParent(arguments);

        return Ext.Array.insert(handlers, 0, [ Ext.create('SwagAttribute.FieldHandler') ]);
    }
});

//{/block}
This example only shows a small validation to allowBlank: false and defines a minimum string length of 10. ExtJS supports different validation functions for an Ext.form.field.Base, for more information see:
ExtJs Docs
Define own backend view
In some cases it is required to define an own view for the backend attribute which is not kind of the default view elements.
For this cases it is possible to use the Ext.form.field.Base class as mixin which allows to define an form field for ExtJs.
The following example shows how to create an view element with three text fields inside.
//{block name="backend/base/attribute/form"}

//{$smarty.block.parent}

//{include file="backend/swag_attribute/SwagAttribute.form.field.OwnType.js"}

//{include file="backend/swag_attribute/SwagAttribute.FieldHandler.js"}

Ext.define('Shopware.attribute.Form-SwagAttribute', {
    override: 'Shopware.attribute.Form',

    registerTypeHandlers: function() {
        var handlers = this.callParent(arguments);

        return Ext.Array.insert(handlers, 0, [ Ext.create('SwagAttribute.FieldHandler') ]);
    }
});

//{/block}
Ext.define('SwagAttribute.FieldHandler', {

    extend: 'Shopware.attribute.FieldHandlerInterface',

    /**
     * @override
     * @param { Shopware.model.AttributeConfig } attribute
     * @returns { boolean }
     */
    supports: function(attribute) {
        var name = attribute.get('columnName');
        if (attribute.get('tableName') !== 's_articles_attributes') {
            return false;
        }
        return (name === 'my_column');
    },

    /**
     * @override
     * @param { Object } field
     * @param { Shopware.model.AttributeConfig } attribute
     * @returns { object }
     */
    create: function(field, attribute) {
        return Ext.apply(field, {
            xtype: 'swag-attribute-type'
        });
    },

    createOwnTypeField: function(field) {
        return Ext.apply(field, {
            xtype: 'swag-attribute-type'
        });
    }
});
Ext.define('SwagAttribute.form.field.OwnType', {
    alias: 'widget.swag-attribute-type',
    extend: 'Ext.form.FieldContainer',
    layout: {
        type: 'hbox'
    },
    mixins: {
        formField: 'Ext.form.field.Base'
    },

    initComponent: function() {
        var me = this;
        me.items = me.createItems();
        me.callParent(arguments);
    },

    createItems: function() {
        var me = this;

        me.prefixField = Ext.create('Ext.form.field.Text', {
            width: 250,
            emptyText: 'sw-',
            allowBlank: false
        });

        me.valueField = Ext.create('Ext.form.field.Text', {
            flex: 1,
            allowBlank: false
        });

        me.suffixField = Ext.create('Ext.form.field.Text', {
            width: 250,
            emptyText: '-ext',
            allowBlank: false
        });

        return [ me.prefixField, me.valueField, me.suffixField ];
    },

    getValue: function() {
        var me = this;
        return {
            prefix: me.prefixField.getValue(),
            value: me.valueField.getValue(),
            suffix: me.suffixField.getValue()
        };
    },

    setValue: function(value) {
        var me = this;

        me.prefixField.setValue('');
        me.valueField.setValue('');
        me.suffixField.setValue('');

        if (!value) {
            return me;
        }

        try {
            var values = Ext.JSON.decode(value);
            me.prefixField.setValue(values.prefix);
            me.valueField.setValue(values.value);
            me.suffixField.setValue(values.suffix);

            return me;
        } catch (e) {
            return me;
        }
    },

    getSubmitData: function() {
        var value = { };
        value[this.name] = Ext.JSON.encode(this.getValue());

        return value;
    }
});
Add your own entities to single- and multi-selection
EntitySearch controller
With the new attribute management, a new search controller was implemented to search for any entity in Shopware.
- Required parameters:
model- Class name of the model to search, e.g.\Shopware\Models\Article\Supplier
- Extra parameters:
ids- If provided, only selects the given IDs and ignores all other parameters
- Optional parameters:
limit- Limits the result setoffset- Sets an offset to the result setterm- Term to search for in any column of entitysortings- Sort results using the Doctrine sorting syntaxconditions- Filter results using the Doctrine filter syntax
Each entity can have its own data providers and search gateways. All search repositories are stored in the \Shopware\Bundle\AttributeBundle\Repository\Registry.
Define own single- and multi-selection
Shopware supports different single and multi selections for a single attribute. This entities are defined in \Shopware\Bundle\AttributeBundle\Service\TypeMapping::getEntities.
It is really simple to define own single and multi selections for plugin entities. It is only required to configure the entity in the attribute configuration.
<?php

namespace SwagAttribute;

use Doctrine\ORM\Tools\SchemaTool;
use Shopware\Components\Plugin;
use Shopware\Components\Plugin\Context\InstallContext;

class SwagAttribute extends Plugin
{
    public function install(InstallContext $context)
    {
        $service = $this->container->get('shopware_attribute.crud_service');

        //generates the database schema for the own entity SwagAttribute
        $em = $this->container->get('models');
        $schemaTool = new SchemaTool($em);
        $schemaTool->updateSchema(
            [ $em->getClassMetadata(\SwagAttribute\Models\SwagAttribute::class) ],
            true
        );

        $service->update(
            's_articles_attributes',
            'my_multi_selection',
            'multi_selection',
            [
                'entity' => \SwagAttribute\Models\SwagAttribute::class,
                'displayInBackend' => true,
                'label' => 'My multi selection',
            ],
            null,
            true
        );
    }
}
The \SwagAttribute\Models\SwagAttribute contains the following sources:
<?php

namespace SwagAttribute\Models;

use Doctrine\ORM\Mapping as ORM;

/**
 * @ORM\Table(name="s_test")
 * @ORM\Entity
 */
class SwagAttribute
{
    /**
     * @var integer $id
     *
     * @ORM\Column(type="integer", nullable=false)
     * @ORM\Id
     * @ORM\GeneratedValue(strategy="IDENTITY")
     */
    private $id;

    /**
     * @var string $name
     *
     * @ORM\Column(type="string", length=500, nullable=false)
     */
    private $name;


    /**
     * @var string $name
     *
     * @ORM\Column(type="string", length=500, nullable=false)
     */
    private $description;

    /**
     * @return int
     */
    public function getId()
    {
        return $this->id;
    }

    /**
     * @return string
     */
    public function getName()
    {
        return $this->name;
    }

    /**
     * @param string $name
     */
    public function setName($name)
    {
        $this->name = $name;
    }

    /**
     * @return string
     */
    public function getDescription()
    {
        return $this->description;
    }

    /**
     * @param string $description
     */
    public function setDescription($description)
    {
        $this->description = $description;
    }
}
If no individual view defined, shopware uses the Shopware.form.field.Grid class for multi selections.
In case the attribute is configured as single selection type, the Shopware.form.field.SingleSelection class is used.
If it is necessary to define which data has to be displayed in the selection elements, it is simply possible to extend the Shopware.attribute.AbstractEntityFieldHandler class to handle the attribute and extend the Shopware.form.field.Grid to modify the displayed data:
Ext.define('SwagAttribute.FieldHandler', {
    extend: 'Shopware.attribute.AbstractEntityFieldHandler',
    entity: "SwagAttribute\\Models\\SwagAttribute",
    singleSelectionClass: 'Shopware.form.field.SingleSelection',
    multiSelectionClass: 'Shopware.form.field.SwagAttributeGrid'
});
Ext.define('Shopware.form.field.SwagAttributeGrid', {
    extend: 'Shopware.form.field.Grid',
    alias: 'widget.shopware-form-field-swag-attribute-grid',

    createColumns: function() {
        return [
            this.createSortingColumn(),
            { dataIndex: 'name', flex: 1 },
            { dataIndex: 'description', flex: 1 },
            this.createActionColumn()
        ];
    },

    createSearchField: function() {
        return Ext.create('Shopware.form.field.SingleSelection', this.getComboConfig());
    }
});
Move attribute fields into another form
All attribute fields are placed in a new fieldset or tab, which sometimes doesn't fit your needs. The following example will show you how to move an article attribute field out of the fieldset into the basic information fieldset.
This section presumes, that you already created your own attribute and registered your view directory.
Add your field and load the data
First, you have to extend the detail base template and overwrite the methods that are responsible for creating the fields and loading the data. In this case, the methods createRightElements and onStoresLoaded will be overwritten.
//{block name="backend/article/view/detail/base"}
//{$smarty.block.parent}
Ext.define('Shopware.apps.Article.view.detail.MyBase', {
    override: 'Shopware.apps.Article.view.detail.Base',

    createRightElements: function() {
        var me = this,
            elements = me.callParent(arguments);

        me.attrField = Ext.create('Ext.form.field.Text', {
            xtype: 'textfield',
            name: 'my_column',
            labelWidth: 155,
            fieldLabel: 'My custom field'
        });

        elements.push(me.attrField);

        return elements;
    },

    onStoresLoaded: function() {
        var me = this;

        me.callParent(arguments);

        Ext.Ajax.request({
            url: '{url controller=AttributeData action=loadData}',
            params: {
                _foreignKey: me.article.get('mainDetailId'),
                _table: 's_articles_attributes'
            },
            success: function(responseData, request) {
                var response = Ext.JSON.decode(responseData.responseText);

                me.attrField.setValue(response.data['__attribute_my_column']);
            }
        });
    }
});
//{/block}
Save your attribute data
To save your data afterwards, you have to overwrite the onSaveArticle method in the controller and extend the options object with your custom callback. But keep in mind to call the original callback if provided.
//{block name="backend/article/controller/detail"}
//{$smarty.block.parent}
Ext.define('Shopware.apps.Article.controller.MyDetail', {
    override: 'Shopware.apps.Article.controller.Detail',

    onSaveArticle: function(win, article, options) {
        var me = this,
            originalCallback = options.callback;

        var customCallback = function(newArticle, success) {
            Ext.callback(originalCallback, this, arguments);

            Ext.Ajax.request({
                method: 'POST',
                url: '{url controller=AttributeData action=saveData}',
                params: {
                    _foreignKey: newArticle.get('mainDetailId'),
                    _table: 's_articles_attributes',
                    __attribute_my_column: me.getBaseFieldSet().attrField.getValue()
                }
            });
        };

        if (!options.callback || options.callback.toString() !== customCallback.toString()) {
            options.callback = customCallback;
        }

        me.callParent([win, article, options]);
    }
});
//{/block}
Using existing attributes
It is possible to use existing attributes like attr1 and attr2 though it's not recommended. To prevent race-conditions with the attribute management itself, you have to uncheck the option "Display in backend" of the desired attribute. It will not be visible within the attribute management fieldset but in your own implementation. Therefore you have to handle the save process yourself and it will not be saved with the default attribute implementation.
Example Plugin "Shoesize"
This example plugin allows the user to enter his shoesize at the registration form and shows this information in the account and the admin backend. You can download the complete source of the plugin SwagShoeSize.zip.
Plugin definition and attribute creation
First we create the necessary attribute using the CRUD service. Notice the displayInBackend option to have the attribute show up in the backend customer detail view.
There is no need to differentiate between the first and subsequent runs of the installer, the CRUD service checks if the attribute needs to be created and does so if necessary.
class SwagShoeSize extends Plugin
{
    public function install(InstallContext $context)
    {
        $service = $this->container->get('shopware_attribute.crud_service');
        $service->update('s_user_attributes', 'swag_shoesize', 'string', [
            'label' => 'Shoesize',
            'displayInBackend' => true
        ]);
    }

    public static function getSubscribedEvents()
    {
        return ['Enlight_Controller_Action_PostDispatchSecure_Frontend' => 'onFrontendPostDispatch'];
    }

    public function onFrontendPostDispatch(\Enlight_Controller_ActionEventArgs $args)
    {
        $args->getSubject()->View()
                ->addTemplateDir($this->getPath() . '/Resources/views');
    }
}
Adding an input element for the attribute to the registration form
We create the template Resources/views/frontend/register/personal_fieldset.tpl and extend the block where we want the input to show up. The attribute is persisted automatically along with the registered customer.
{extends file="parent:frontend/register/personal_fieldset.tpl"}
{block name='frontend_register_personal_fieldset_input_lastname'}
    {$smarty.block.parent}
    <div class="register--shoesize">
        <input type="number"
               placeholder="Shoesize"
               name="register[personal][attribute][swagShoesize]"
               value="{$form_data.attribute.swagShoesize|escape}" />
               <!-- Notice the camelCase of the attribute name! -->
    </div>
{/block}
Attention: Although the field names are defined in snake_case when created using the CRUD-service, you need to use camelCase in name attributes. This is necessary due to the way the internally used FormBuilder works.
Show attributes in the frontend
Attributes are loaded automatically with the entity they belong to. To display the shoesize in the account we create Resources/views/frontend/account/index.tpl:
{extends file="parent:frontend/account/index.tpl"}
{block name="frontend_account_index_info_content"}
    {$smarty.block.parent}
    {if not empty($sUserData.additional.user.swag_shoesize)}
        <div class="panel--body is--wide">
            Shoesize: {$sUserData.additional.user.swag_shoesize}
        </div>
    {/if}
{/block}
Plugin Download: SwagAttribute.zip
Attribute label translations
With Shopware 5.3 it is possible to translate the different labels for an attribute (help, support, label) via snippets.
For example, if you create a new attribute in table s_articles_attributes named attr1, you can specify three translations:
| ExtJS field | Snippet name |
|---|---|
label |
s_articles_attributes_attr1_label |
support text |
s_articles_attributes_attr1_supportText |
help text |
s_articles_attributes_attr1_helpText |
Example: Translation for s_article_attributes.my_column
<?php

namespace SwagAttribute;

use Shopware\Bundle\AttributeBundle\Service\TypeMapping;
use Shopware\Components\Plugin;
use Shopware\Components\Plugin\Context\InstallContext;

class SwagAttribute extends Plugin
{
    public function install(InstallContext $context)
    {
        $service = $this->container->get('shopware_attribute.crud_service');

        $service->update('s_articles_attributes', 'my_column', TypeMapping::TYPE_STRING, [
            'displayInBackend' => true,
            'label' => 'My column default label',
            'supportText' => 'My column default support text',
            'helpText' => 'My column default help text'
        ]);
    }
}
The snippets are stored in SwagAttribute/Resources/snippets/backend/attribute_columns.ini:
[en_GB]
s_articles_attributes_my_column_label = "English label"
s_articles_attributes_my_column_supportText = "English support text"
s_articles_attributes_my_column_helpText = "English help text"

[de_DE]
s_articles_attributes_my_column_label = "Deutsches label"
s_articles_attributes_my_column_supportText = "Deutscher support text"
s_articles_attributes_my_column_helpText = "Deutscher help text"
Product slider based on attributes
As of Shopware 5.3 it is easily possible to display additional product sliders or box listing with the help of attributes and the listing widgets.
The following functions allows to display product templates based on a product stream or a selection of product numbers:
* Shopware/Controllers/Widgets/Listing.php::streamAction
* Shopware/Controllers/Widgets/Listing.php::productsAction
The following example displays additional products in a customer account.
First the s_user_attributes table get two new columns:
- recommendedVariants - "Multi selection - Variants- which should be displayed
-recommendedStream` - "Single selection - Product Stream" - which should be displayed
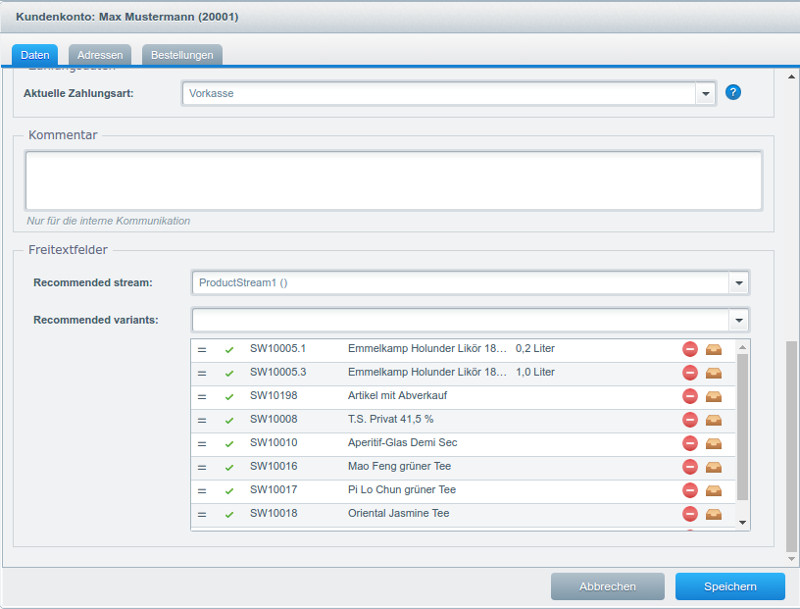
In case of a plugin, use the following code:
/** @var CrudService $crud */
$crud = $this->container->get('shopware_attribute.crud_service');

$crud->update('s_user_attributes', 'recommendedVariants', 'multi_selection', [
    'displayInBackend' => true,
    'label' => 'Recommended variants',
    'entity' => 'Shopware\Models\Article\Detail',
]);
$crud->update('s_user_attributes', 'recommendedStream', 'single_selection', [
    'displayInBackend' => true,
    'label' => 'Recommended stream',
    'entity' => 'Shopware\Models\ProductStream\ProductStream',
]);
To display the data in the account section, add the following source code to a template which extends the frontend/account/index.tpl:
{extends file="parent:frontend/account/index.tpl"}
{block name="frontend_account_index_welcome"}
    {$smarty.block.parent}

    {$data = $sUserData.additional.user}

    <h2>Recommended variants for you</h2>

    {action module=widgets controller=listing action=products numbers=$data.recommendedvariants type=slider}

    <h2>Recommended stream</h2>

    {action module=widgets controller=listing action=stream streamId=$data.recommendedstream type=slider}

{/block}
To display a list of product boxes, the type=slider property has to be removed:
{extends file="parent:frontend/account/index.tpl"}
{block name="frontend_account_index_welcome"}
    {$smarty.block.parent}

    {$data = $sUserData.additional.user}

    <h2>Recommended variants for you</h2>

    {action module=widgets controller=listing action=products numbers=$data.recommendedvariants productBoxLayout='list'}

    <h2>Recommended stream</h2>

    {action module=widgets controller=listing action=stream streamId=$data.recommendedstream productBoxLayout='image'}
{/block}
Within the template file the widgets actions are called with the given customer attribute data. Thats it. Now choose individual products or streams which will be shown to the customer.
Download plugin
The whole plugin can be downloaded here.