Backend Components - Basics
This tutorial is part of a series that covers the Shopware Backend Components. These components have been built to simplify and speed up the development of Backend modules.
In this tutorial assumes that you have basic knowledge of both Shopware plugin development and the ExtJS framework. The configuration details covered here will concern only Shopware specific logic, and not the underlying ExtJS options.
We also recommend the following articles:
ExtJS Documentation
Shopware Plugin Concept
Since components may affect each other, some specific configuration options will be declared and applied in later tutorials. You'll find those links at the appropriate places. These tutorials are built upon each other and you will find a zip file with the results of the previous tutorial at the top of each one. In case you skip a tutorial, make sure to use the latest code inside the zip files.
Information for your development environment configurationFor debugging purposes, we recommend disabling the Shopware caches, or you may have to clean the caches after every change to the backend modules.
To do so, you can add the following configuration to your `config.php`: ```php 'front' => [ 'throwExceptions' => true ], 'template' => [ 'forceCompile' => true ], 'model' => [ 'cacheProvider' => 'Array' ], 'cache' => [ 'backend' => 'Black-Hole', 'backendOptions' => [], 'frontendOptions' => [ 'write_control' => false ] ], ``` **Important: This configuration should *not* be used in production.**PHP Implementation
The backend contains some Shopware specific components, which are based on different ExtJs modules. By using these components, you can reduce the amount of time and code needed to develop your own modules, especially when prototyping.
We will start by writing our own small backend application with standard components. First we have to create a plugin which provides us with some basic features. They are:
- A menu item in the backend
- Your own Doctrine model
- Your own backend controller
To speed things up, our plugin is expected to create a new product list to cover all sections of our backend components. Since the doctrine models are an essential part of the backend development and modules, this tutorial will rebuild and explain some parts of the Shopware\Models\Article namespace.
The Plugin Base File
First, you have to create a directory in ..\custom\plugins called SwagProductBasic with a new file called SwagProductBasic.php in it. The following features will be implemented in the plugin file class:
- Create a backend menu item which calls the controller
<?php

namespace SwagProductBasic;

use Shopware\Components\Plugin;

class SwagProductBasic extends Plugin
{
    /**
     * {@inheritdoc}
     */
    public function install(InstallContext $installContext)
    {
        parent::install($installContext);
    }
}
Create a menu item in the backend
Create a /../SwagProductBasic/Resources/menu.xml file.
<?xml version="1.0" encoding="utf-8"?>
<menu xmlns:xsi="http://www.w3.org/2001/XMLSchema-instance"
      xsi:noNamespaceSchemaLocation="https://raw.githubusercontent.com/shopware5/shopware/5.3/engine/Shopware/Components/Plugin/schema/menu.xsd">

    <entries>
        <entry>
            <name>SwagBasicProduct</name>
            <label lang="en">Swag basic product</label>
            <label lang="de">Swag Basis Produkt</label>
            <controller>SwagProductBasic</controller>
            <action>index</action>
            <class>sprite-application-block</class>
            <parent identifiedBy="controller">Article</parent>
        </entry>
    </entries>
</menu>
The Doctrine Model - /Models/Product.php
Afterwards we create a new product model in /Models/Product.php.
<?php

namespace SwagProductBasic\Models;

use Shopware\Components\Model\ModelEntity;
use Doctrine\ORM\Mapping as ORM;

/**
 * @ORM\Entity
 * @ORM\Table(name="s_product")
 */
class Product extends ModelEntity
{
    /**
     * @var integer $id
     *
     * @ORM\Id
     * @ORM\Column(type="integer")
     * @ORM\GeneratedValue(strategy="IDENTITY")
     */
    private $id;

    /**
     * @var string $name
     *
     * @ORM\Column()
     */
    private $name;

    /**
     * @var integer $active
     *
     * @ORM\Column(type="boolean")
     */
    private $active = false;

    /**
     * @var string $description
     *
     * @ORM\Column(type="text", nullable=true)
     */
    private $description = null;

    /**
     * @var string $descriptionLong
     *
     * @ORM\Column(type="text", nullable=true)
     */
    private $descriptionLong = null;

    /**
     * @var integer $lastStock
     *
     * @ORM\Column(type="boolean", nullable=false)
     */
    private $lastStock = false;

    /**
     * @var \DateTime $added
     *
     * @ORM\Column(type="date", nullable=true)
     */
    private $createDate = null;

    /**
     * @return int
     */
    public function getId()
    {
        return $this->id;
    }


    /**
     * @param int $active
     */
    public function setActive($active)
    {
        $this->active = $active;
    }

    /**
     * @return int
     */
    public function getActive()
    {
        return $this->active;
    }

    /**
     * @param \DateTime $createDate
     */
    public function setCreateDate($createDate)
    {
        $this->createDate = $createDate;
    }

    /**
     * @return \DateTime
     */
    public function getCreateDate()
    {
        return $this->createDate;
    }

    /**
     * @param string $description
     */
    public function setDescription($description)
    {
        $this->description = $description;
    }

    /**
     * @return string
     */
    public function getDescription()
    {
        return $this->description;
    }

    /**
     * @param string $name
     */
    public function setName($name)
    {
        $this->name = $name;
    }

    /**
     * @return string
     */
    public function getName()
    {
        return $this->name;
    }

    /**
     * @param string $descriptionLong
     */
    public function setDescriptionLong($descriptionLong)
    {
        $this->descriptionLong = $descriptionLong;
    }

    /**
     * @return string
     */
    public function getDescriptionLong()
    {
        return $this->descriptionLong;
    }

    /**
     * @param int $lastStock
     */
    public function setLastStock($lastStock)
    {
        $this->lastStock = $lastStock;
    }

    /**
     * @return int
     */
    public function getLastStock()
    {
        return $this->lastStock;
    }
}
The product model shown above contains just a fraction of the original Shopware article model, but is sufficient for our purpose. Please notice the namespace at the top. The PluginNameSpace/Models namespace is used exclusively for plugin models. To create the associated database table, you should use Doctrine's schema tool, which can be found in\Doctrine\ORM\Tools\SchemaTool`. The following features will now be implemented in the plugin base file:
- Create the database tables in the
install()method - Add demo data to the new database table
- Delete the database tables in the
uninstall()method
<?php

namespace SwagProductBasic;

use Doctrine\ORM\Tools\SchemaTool;
use Shopware\Components\Plugin;
use Shopware\Components\Plugin\Context\ActivateContext;
use Shopware\Components\Plugin\Context\InstallContext;
use Shopware\Components\Plugin\Context\UninstallContext;
use SwagProductBasic\Models\Product;

class SwagProductBasic extends Plugin
{
    /**
     * {@inheritdoc}
     */
    public function install(InstallContext $installContext)
    {
        $this->createDatabase();

        $this->addDemoData();
    }

    /**
     * {@inheritdoc}
     */
    public function activate(ActivateContext $activateContext)
    {
        $activateContext->scheduleClearCache(InstallContext::CACHE_LIST_ALL);
    }

    public function uninstall(UninstallContext $uninstallContext)
    {
        if (!$uninstallContext->keepUserData()) {
            $this->removeDatabase();
        }
    }

    private function createDatabase()
    {
        $modelManager = $this->container->get('models');
        $tool = new SchemaTool($modelManager);

        $classes = $this->getClasses($modelManager);

        $tool->updateSchema($classes, true); // make sure to use the save mode
    }

    private function removeDatabase()
    {
        $modelManager = $this->container->get('models');
        $tool = new SchemaTool($modelManager);

        $classes = $this->getClasses($modelManager);

        $tool->dropSchema($classes);
    }

    /**
     * @param ModelManager $modelManager
     * @return array
     */
    private function getClasses(ModelManager $modelManager)
    {
        return [
            $modelManager->getClassMetadata(Product::class)
        ];
    }

    private function addDemoData()
    {
        $sql = "
            INSERT IGNORE INTO s_product (`name`, active, description, descriptionLong, lastStock, createDate)
            SELECT
                a.name,
                a.active,
                a.description,
                a.description_long as descriptionLong,
                a.laststock as lastStock,
                a.datum as createDate
            FROM s_articles a
        ";

        $this->container->get('dbal_connection')->exec($sql);
    }
}
The helper method addDemoData() imports all articles from the s_articles table into the new table s_products. So we don't need to create new demo data.
The Backend Controller Controllers/Backend/SwagProduct.php
Finally, we implement our own PHP controller in Controllers/Backend/SwagProduct.php:
<?php

class Shopware_Controllers_Backend_SwagProductBasic
    extends Shopware_Controllers_Backend_Application
{
    protected $model = Product::class;
    protected $alias = 'product';
}
Different from previous backend controllers, the SwagProductBasic controller derives from Shopware_Controllers_Backend_Application instead of Shopware_Controllers_Backend_ExtJs. This controller has been exclusively designed to include different CRUD operations in every controller. The only requirements are the properties $model and $alias. The property $model must be the complete name of the model, including the namespace, as it will be used for the Doctrine queries and CRUD operations later on. If the property $model is not configured properly, you will get the following error message:
The property $alias will be the query alias used in every query with the root model ($model property).
ExtJS Implementation
Now, we go on to the proper usage of the backend components. First, we implement the following components in our directory Resources/views/backend:
swag_product_basic/app.jsswag_product_basic/controller/main.jsswag_product_basic/model/product.jsswag_product_basic/store/product.jsswag_product_basic/view/list/window.jsswag_product_basic/view/list/product.js
The Subapplication - swag_product_basic/app.js
To start, we define the starting point of our backend application in swag_product_basic/app.js.
Ext.define('Shopware.apps.SwagProductBasic', {
    extend: 'Enlight.app.SubApplication',

    name:'Shopware.apps.SwagProductBasic',

    loadPath: '{url action=load}',
    bulkLoad: true,

    controllers: [ 'Main' ],

    views: [
        'list.Window',
        'list.Product'
    ],

    models: [ 'Product' ],
    stores: [ 'Product' ],

    launch: function() {
        return this.getController('Main').mainWindow;
    }
});
The SubApplication itself hasn't been changed. There will still be the definition of the different components which will be loaded by the url in loadPath.
The launch() method will instantiate the main controller and return its mainWindow.
The Main Controller - swag_product_basic/controller/main.js
The main controller is responsible for starting the application by creating and displaying the listing window:
Ext.define('Shopware.apps.SwagProductBasic.controller.Main', {
    extend: 'Enlight.app.Controller',

    init: function() {
        var me = this;
        me.mainWindow = me.getView('list.Window').create({ }).show();
    }
});
There is not much to say about the main controller. The only important thing is to set the property mainWindow, in order to ensure that your application can be closed by clicking the footer button.
The Listing Window - swag_product_basic/view/list/window.js
The listing window derives from the Shopware.window.Listing component and will be the first backend component that will be used in our application.
Ext.define('Shopware.apps.SwagProductBasic.view.list.Window', {
    extend: 'Shopware.window.Listing',
    alias: 'widget.product-list-window',
    height: 450,
    title : '{s name=window_title}Product listing{/s}',

    configure: function() {
        return {
            listingGrid: 'Shopware.apps.SwagProductBasic.view.list.Product',
            listingStore: 'Shopware.apps.SwagProductBasic.store.Product'
        };
    }
});
The Shopware.window.Listing component has 2 requirements, which have to be met in the configure() method. The configure() method is meant to be your starting point to set Shopware related configurations. This method is available in every Shopware backend component.
listingGrid- Should be the class name of theShopware.grid.Panelwhich will be displayed inside the window. We'll define that class inswag_product_basic/view/list/product.jsfile in the next step.listingStore- Should be the class name of theShopware.store.Listingwhich will be loaded when starting the application. This store will be the store used in theShopware.grid.Panel.
It is important to set property alias, otherwise all component events can't be determined by the ExtJS Component Query.
The Grid Panel - swag_product_basic/view/list/product.js
Next, we implement the Shopware.grid.Panel in swag_product_basic/view/list/product.js.
Ext.define('Shopware.apps.SwagProductBasic.view.list.Product', {
    extend: 'Shopware.grid.Panel',
    alias:  'widget.product-listing-grid',
    region: 'center'
});
The only requirement of this component is that you provide a store during its creation. The store doesn't have to be filled with data right now, but must have the model class defined.
Keep in mind that you still have to provide an alias for the component.
Since the Shopware.grid.Panel can be used everywhere, you have to define region: 'center' in the Shopware.window.Listing because a border layout has been applied to the panel.
The Data Model - swag_product_basic/model/product.js
Next, we implement the Shopware.data.Model which reflects the data structure of Shopware\CustomModels\Product\Product.
For this, we implement the following code in swag_product_basic/model/product.js:
Ext.define('Shopware.apps.SwagProductBasic.model.Product', {
    extend: 'Shopware.data.Model',

    configure: function() {
        return {
            controller: 'SwagProduct'
        };
    },

    fields: [
        { name : 'id', type: 'int', useNull: true },
        { name : 'name', type: 'string' },
        { name : 'active', type: 'boolean' },
        { name : 'createDate', type: 'date' },
        { name : 'description', type: 'string', useNull: true },
        { name : 'descriptionLong', type: 'string', useNull: true },
        { name : 'lastStock', type: 'boolean' }
    ]
});
The only required property here is the controller property, but only if this is the main model of the application. The main model is known as the model which is used as basis for the application, and should be the $model property of your backend PHP controller.
In case you want to do CRUD operations on your others models, you may set the controller property in those too. You will then be able to perform operations like create, update and delete.
The property controller expects the individual name of your Shopware_Controllers_Backend_Application controller. Given that your controller is called Shopware_Controllers_Backend_SwagProductBasic, the individual name would be SwagProductBasic.
The Data Store - swag_product_basic/store/product.js
Finally, we have to define the Shopware.store.Listing store, which will be used for the Shopware.grid.Panel. For this, we implement the following code in swag_product_basic/store/product.js:
Ext.define('Shopware.apps.SwagProductBasic.store.Product', {
    extend:'Shopware.store.Listing',

    configure: function() {
        return {
            controller: 'SwagProduct'
        };
    },
    model: 'Shopware.apps.SwagProductBasic.model.Product'
});
The Shopware.store.Listing component only requires the individual PHP controller class name. This should be SwagProduct like seen above.
At this point, the application should be usable and we can take a look at our listing:
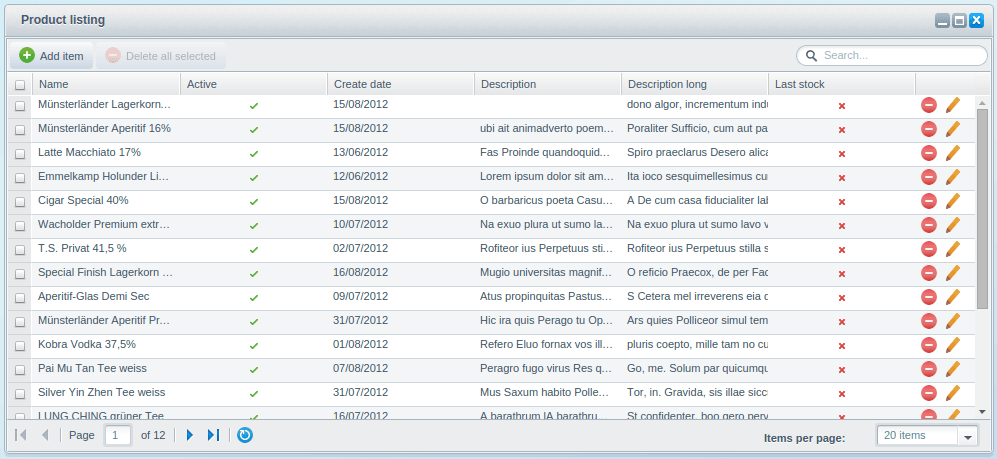
The application now supports the following operations:
- Listing data including pagination
- Sorting data by using the column names
- Filtering data by using the free text search in the toolbar
- Deleting single items using the delete action column
- Deleting multiple items using the checkboxes and the button Delete all selected in the toolbar
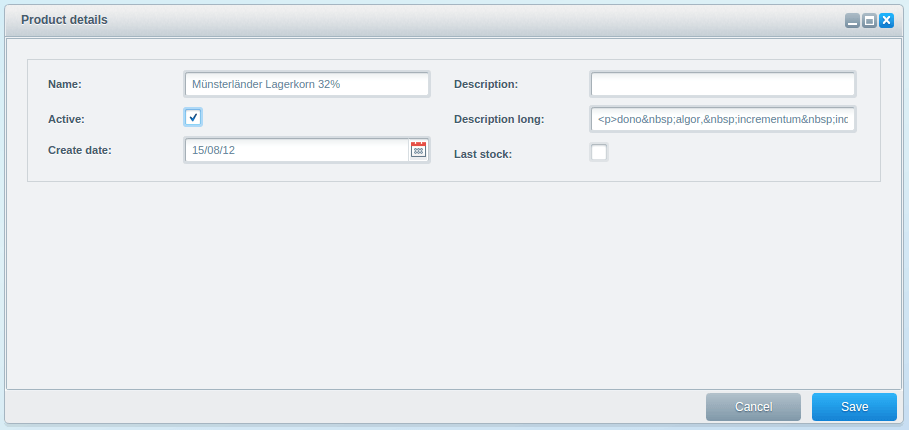
The last 25% to complete our application
Until now, we have implemented 75% of the whole application. What's still missing is the detail window. This should be opened by clicking the pencil icon at the end of a line. Right now you'll get the following error message in the debug console:
To make the application complete, we have to implement the following components:
swag_product_basic/view/detail/window.jsswag_product_basic/view/detail/product.js
The Detail Window - swag_product_basic/view/detail/window.js
Here, you have two tasks to do. First, implement a new Shopware.window.Detail component and second, declare it in our Shopware.grid.Panel. But first, implement the detail window by putting the following code in swag_product_basic/view/detail/window.js:
Ext.define('Shopware.apps.SwagProductBasic.view.detail.Window', {
    extend: 'Shopware.window.Detail',
    alias: 'widget.product-detail-window',
    title : '{s name=title}Product details{/s}',
    height: 420,
    width: 900
});
The only requirement for this component is that you have to provide a property named record, which contains a Shopware.data.Model instance, while instancing the component. The detail window will be assembled automatically, based on the record.
We now have to define the detail window at two places.
- Define the component in our app in
swag_product_basic/app.js:
Ext.define('Shopware.apps.SwagProductBasic', {
    extend: 'Enlight.app.SubApplication',
    views: [
        ...
        'detail.Window'
    ],

    models: [ ... ],
    stores: [ ... ],
    controllers: [ ... ],

    launch: function() { ... }
});
- Define the
detailWindowin ourShopware.grid.Panel(swag_product_basic/view/list/product.js) to let the application know which component should be called by clicking on the pencil:
Ext.define('Shopware.apps.SwagProductBasic.view.list.Product', {
    extend: 'Shopware.grid.Panel',
    ...
    configure: function() {
        return {
            detailWindow: 'Shopware.apps.SwagProductBasic.view.detail.Window'
        };
    }
});
The Product Detail Window - swag_product_basic/view/detail/product.js
The last thing to do is implement the Shopware.model.Container which can be used for the representation of a model. The following code needs to be implemented in swag_product_basic/view/detail/product.js:
Ext.define('Shopware.apps.SwagProductBasic.view.detail.Product', {
    extend: 'Shopware.model.Container',
    padding: 20,

    configure: function() {
        return {
            controller: 'SwagProduct'
        };
    }
});
The Shopware.model.Container has two requirements. A proper configured controller property and the appropriate Shopware.data.Model record handed over. The Shopware.model.Container serves as container class for one or more models. A detailed configuration can be found in the upcoming tutorials. For our purpose, it's enough to provide the controller property.
Like above, you have to register your component in your app.js:
Ext.define('Shopware.apps.SwagProductBasic', {
    extend: 'Enlight.app.SubApplication',
    views: [
        ...
        'detail.Product'
    ],

    controllers: [ ... ],
    models: [ ... ],
    stores: [ ... ],
    launch: function() { ... }
});
In addition, you have to update your Shopware.data.Model to make it know about your detail window. For that, add the following code to swag_product_basic/model/product.js:
Ext.define('Shopware.apps.SwagProductBasic.model.Product', {
    extend: 'Shopware.data.Model',

    configure: function() {
        return {
            controller: 'SwagProduct',
            detail: 'Shopware.apps.SwagProductBasic.view.detail.Product'
        };
    },
    fields: [
        { name : 'id', type: 'int', useNull: true },
        ...
    ]
});
The Shopware configuration property detail defines which component should be created when the detail window for Shopware.apps.SwagProductBasic.model.Product is requested. Now, the detail window will always look the same in the whole backend.
Plugin Download
Congratulations! You have just created your first backend application used the Shopware backend components. The application is completely usable and provides you with all features you can see in other backend applications. You are now able to create and edit records, too.
You can download the plugin here: SwagProductBasic.zip
Further Tutorials
In our next tutorial, we will cover more implementation and customization options of the Shopware listing backend component.
Proceed to Backend Components - Listing.