Digital Publishing Elements
Introduction
Digital Publishing is introduced in Shopware 5.1.0 as a new advanced feature. The new backend module enables you to design custom HTML banners right inside of Shopware and use them, for example, in the shopping worlds. In a layout tree, you can create new design layers to add different elements like texts, images, or even button elements and place them over different background types. To unleash the full potential of this new feature, we created the possibility for third party developers to create custom elements for this module. In this article, we want to show you how to get started with your own Digital Publishing element. As an example, we will build a fully functional YouTube element. At the end of this article, you will find a download link to get the complete example plugin.
The basic plugin structure
In this article we'll be focusing on the important parts to get started with the development of custom digital publishing elements. If you want to get more information about developing plugins for Shopware in general, please head over to the plugin quick start guide.
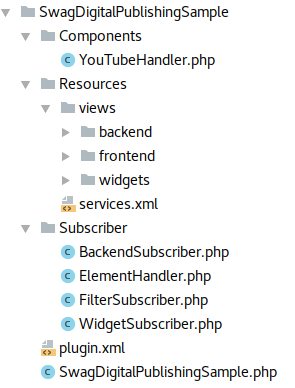
To add a new element to the Digital Publishing module we will need the following components:
- Subscriber, to register for specific events
- Backend handler, which defines our new element
- Frontend template
Registering the subscriber
First we register new subscribers in the service.xml of our plugin.
<container xmlns="http://symfony.com/schema/dic/services"
           xmlns:xsi="http://www.w3.org/2001/XMLSchema-instance"
           xsi:schemaLocation="http://symfony.com/schema/dic/services http://symfony.com/schema/dic/services/services-1.0.xsd">

    <services>
        <!-- Register BackendSubscriber -->
        <service id="swag_digipub.subscriber.backend" class="SwagDigitalPublishingSample\Subscriber\BackendSubscriber">
            <argument>%swag_digital_publishing_sample.plugin_dir%</argument>
            <tag name="shopware.event_subscriber"/>
        </service>

        <!-- Register WidgetSubscriber -->
        <service id="swag_digipub.subscriber.widget" class="SwagDigitalPublishingSample\Subscriber\WidgetSubscriber">
            <argument>%swag_digital_publishing_sample.plugin_dir%</argument>
            <tag name="shopware.event_subscriber"/>
        </service>

        <!-- Register FilterSubscriber -->
        <service id="swag_digipub.subscriber.filter" class="SwagDigitalPublishingSample\Subscriber\FilterSubscriber">
            <tag name="shopware.event_subscriber"/>
        </service>

        <!-- Register ElementHandler -->
        <service id="swag_digipub.subscriber.element" class="SwagDigitalPublishingSample\Subscriber\ElementHandler">
            <tag name="shopware.event_subscriber"/>
        </service>

    </services>
</container>
To complete this step we have to create the corresponding files in the Subscriber directory of our plugin. To split the tasks between backend and frontend, for example, we create the domain specific files. So let's take a look at our subscriber files.
In the getSubscribedEvents() method we return all necessary events we want to subscribe to and the corresponding callback method. We have at least three callback methods which are called by our subscriber:
<?php

namespace SwagDigitalPublishingSample\Subscriber;

use Enlight\Event\SubscriberInterface;
use Enlight_Controller_Action;

/**
 * Class Resources
 * @package Shopware\DigitalPublishingSample\Subscriber
 */
class BackendSubscriber implements SubscriberInterface
{
    /**
     * @var string
     */
    private $pluginBaseDirectory;

    /**
     * Subscriber class constructor.
     *
     * @param string $pluginBaseDirectory
     */
    public function __construct($pluginBaseDirectory)
    {
        $this->pluginBaseDirectory = $pluginBaseDirectory;
    }

    /**
     * Returns an array of events you want to subscribe to
     * and the names of the corresponding callback methods.
     *
     * @return array
     */
    public static function getSubscribedEvents()
    {
        return [
            'Enlight_Controller_Action_PostDispatchSecure_Backend_SwagDigitalPublishing' => 'onPostDispatchBackend',
        ];
    }

    /**
     * Extends the backend templates with the necessary template files.
     *
     * @param \Enlight_Event_EventArgs $args
     */
    public function onPostDispatchBackend(\Enlight_Event_EventArgs $args)
    {
        /** @var Enlight_Controller_Action $subject */
        $subject = $args->getSubject();
        $view = $subject->View();

        $view->addTemplateDir($this->pluginBaseDirectory . '/Resources/views/');
        $view->extendsTemplate('backend/swag_digital_publishing_sample/view/editor/extension.js');
        $view->extendsTemplate('backend/swag_digital_publishing_sample/view/editor/elements/youtube_element_handler.js');
    }
}
<?php

namespace SwagDigitalPublishingSample\Subscriber;

use Enlight\Event\SubscriberInterface;

/**
 * Class Resources
 * @package Shopware\DigitalPublishingSample\Subscriber
 */
class WidgetSubscriber implements SubscriberInterface
{
    /**
     * @var string
     */
    private $pluginBaseDirectory;

    /**
     * Subscriber class constructor.
     *
     * @param string $pluginBaseDirectory
     */
    public function __construct($pluginBaseDirectory)
    {
        $this->pluginBaseDirectory = $pluginBaseDirectory;
    }

    /**
     * Returns an array of events you want to subscribe to
     * and the names of the corresponding callback methods.
     *
     * @return array
     */
    public static function getSubscribedEvents()
    {
        return [
            'Enlight_Controller_Action_PostDispatchSecure_Widgets_SwagDigitalPublishing' => 'onPostDispatchWidget',
            'Enlight_Controller_Action_PostDispatchSecure_Widgets_Emotion' => 'onPostDispatchWidget',
        ];
    }

    /**
     * Adds the template directory of the plugin to extend the frontend templates.
     *
     * @param \Enlight_Event_EventArgs $args
     */
    public function onPostDispatchWidget(\Enlight_Event_EventArgs $args)
    {
        /** @var \Enlight_Controller_Action $subject */
        $subject = $args->getSubject();
        $view = $subject->View();

        $view->addTemplateDir($this->pluginBaseDirectory . '/Resources/views/');
    }
}
onPostDispatchBackend: extends the backend with our ExtJS template files.onPostDispatchWidget: Adds the Views directory, so we can automatically extend the templates of the storefront.
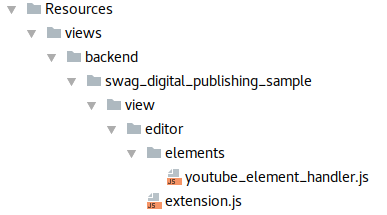
In the next step, we will look at the first event, which subscribes to the post dispatch of the backend. With it, we can extend the backend with our ExtJS template files in the onPostDispatchBackend callback. To add a new element to the Digital Publishing module, we have to extend the original container.js of the editor with our own extension.js file. All files should go in the Views directory of our plugin, in backend/swag_digital_publishing_sample/view/editor. We also create the custom handler for our element in the elements subdirectory called youtube_element_handler.js. These files are added to the backend template by the extendsTemplate() method.
Creating the backend handler
Now that we extended the backend template and created the necessary ExtJS files, we can write some code. Let's start with the custom handler for our element: Resources/views/backend/swag_digital_publishing_sample/view/editor/elements/youtube_element_handler.js
//{block name="backend/swag_digital_publishing/view/editor/abstract_element_handler"}
// {$smarty.block.parent}
Ext.define('Shopware.apps.SwagDigitalPublishing.view.editor.elements.YouTubeElementHandler', {

    extend: 'Shopware.apps.SwagDigitalPublishing.view.editor.elements.AbstractElementHandler',

    name: 'youtube',

    label: 'YouTube Video',

    iconCls: 'sprite-film-youtube',

    createFormItems: function(elementRecord, data) {}
});
//{/block}
To extend the backend template, we're editing the Smarty {block} of the abstract handler by using the {$smarty.block.parent} function, so we can append our custom handler to the parent {block}. Every element handler has to extend the abstract handler to implement the basic functionality for the Digital Publishing elements. This has also some advantages for you, because you don't have to take care of data handling and other trivial operations. All element handlers have to define the following properties:
name: a machine name for internal uselabel: the readable name of the elementiconCls: the CSS class for the element iconcreateFormItems(): the method which returns the configuration fields for this element
Now that we have created the handler, we have to add it to the list of available element handlers. Therefore, we created the extension.js to extend the original editor: Resources/views/backend/swag_digital_publishing_sample/view/editor/extension.js
//{block name="backend/swag_digital_publishing/view/editor/container"}
// {$smarty.block.parent}
Ext.define('Shopware.apps.SwagDigitalPublishing.view.editor.YouTubeExtension', {

    override: 'Shopware.apps.SwagDigitalPublishing.view.editor.Container',

    initComponent: function() {
        var me = this;

        /**
         * Create an instance of your custom element handler.
         */
        var youTubeHandler = Ext.create('Shopware.apps.SwagDigitalPublishing.view.editor.elements.YouTubeElementHandler');

        /**
         * Check if there is already a registered handler with the same name.
         */
        if (me.getElementHandlerByName(youTubeHandler.getName()) === null) {

            /**
             * Add the custom handler to the list of available handlers.
             */
            me.elementHandlers.push(youTubeHandler);
        }

        /**
         * Call the parent init method.
         */
        me.callParent(arguments);
    }
});
//{/block}
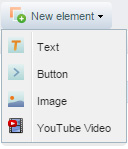
We're using an override of the Shopware.apps.SwagDigitalPublishing.view.editor.Container to add a new instance of our custom handler to the elementHandlers property, which holds a list of all available handlers. Don't forget to call me.callParent(arguments) to make sure the original component works as intended. After installing the plugin, you should already see the new element as a selectable item in the element menu of the Digital Publishing editor.
Adding configuration fields
Now that have a new selectable element, we want to add some configuration fields to it, which the user can use to edit the element. We will use the createFormItems() method to create a custom field set.
createFormItems: function(elementRecord, data) {
    var me = this;

    me.generalFieldset = Ext.create('Ext.form.FieldSet', {
        title: 'YouTube Settings',
        layout: 'anchor',
        defaults: {
            anchor : '100%',
            labelWidth: 100
        },
        items: [{
            xtype: 'textfield',
            name: 'youTubeId',
            translatable: true,
            fieldLabel: 'YouTube ID',
            value: data['youTubeId'] || '',
            listeners: {
                change: Ext.bind(me.updateElementRecord, me, [ me.formPanel, elementRecord ])
            }
        }, {
            xtype: 'numberfield',
            name: 'maxWidth',
            fieldLabel: 'Max width',
            value: data['maxWidth'] || 280,
            allowDecimals: false,
            minValue: 0,
            listeners: {
                change: Ext.bind(me.updateElementRecord, me, [ me.formPanel, elementRecord ])
            }
        }, {
            xtype: 'numberfield',
            name: 'maxHeight',
            fieldLabel: 'Max height',
            value: data['maxHeight'] || 158,
            allowDecimals: false,
            minValue: 0,
            listeners: {
                change: Ext.bind(me.updateElementRecord, me, [ me.formPanel, elementRecord ])
            }
        }, {
            xtype: 'checkbox',
            name: 'controls',
            fieldLabel: 'Show Controls',
            checked: !!data['controls'],
            listeners: {
                change: Ext.bind(me.updateElementRecord, me, [ me.formPanel, elementRecord ])
            }
        }, {
            xtype: 'checkbox',
            name: 'showinfo',
            fieldLabel: 'Show Info',
            checked: !!data['showinfo'],
            listeners: {
                change: Ext.bind(me.updateElementRecord, me, [ me.formPanel, elementRecord ])
            }
        }]
    });

    return me.generalFieldset;
}
It is recommended to implement at least one field set, as shown in the example, to keep a consistent look and feel of the settings across all elements. In the items of the field set, you can use any kind of ExtJS fields, so you have many possibilities when creating your custom element. All fields of your element are just defined by this form. But there also some things you have to take care of.
Loading existing data to the fields
The configuration form will not automatically load data from a model, because all elements are saved in a JSON encoded payload string. The decoded data of the fields is already passed in the data argument of the createFormItems() method. All you have to do is set the value of each field manually. You can also define a default value for the field. Example: value: data['maxWidth'] || 280,.
Adding change listeners
To always update the corresponding data model with recent data from your element configuration, you have to implement event listeners to your form fields. The listener has to be bound to the me.updateElementRecord method, which needs the form panel (me.formPanel) and the element model (elementRecord) as its arguments. In most cases, you will register to the change event of the field. This is necessary for the live preview, to show the changes directly to the user, among other reasons.
Making fields translatable
We already implemented the functionality to translate the fields of an element into different languages. If you want to make some fields of your element translatable, you just have to add the corresponding property to the field: translatable: true. When you do so, a small globe will appear in your field, where the user can add the translations.
Creating the frontend template
Now that we have a fully functional element, we want to add the frontend template. In the subscriber we already added the Resources/views/ directory of our plugin via the onPostDispatchWidget callback, so we can directly add a new template file. All element templates are located in the widgets/swag_digital_publishing/components/ directory. We create the same structure for our custom element and create the corresponding template file youtube.tpl. It is important that the file has exactly the same name as we defined it in the ExtJS handler. The template will then be loaded automatically for our element.
<div class="dig-pub--youtube">
{$controls = 0}
{$showinfo = 0}
{if $element.controls}
{$controls = 1}
{/if}
{if $element.showinfo}
{$showinfo = 1}
{/if}
<iframe class="youtube--frame"
style="width: {$element.maxWidth / 16}rem; height: {$element.maxHeight / 16}rem;"
src="https://www.youtube-nocookie.com/embed/{$element.youTubeId}?rel=0&controls={$controls}&showinfo={$showinfo}"
frameborder="0"
allowfullscreen>
</iframe>
</div>
The rest is just little bit of frontend details and Smarty code. All element fields are available in the {$element} variable.
Styling the element
To style the element we already added a new LESS file called all.less that will be loaded automatically. The file is located in the frontend directory under Resources/views/frontend/less/. Here we can put some LESS code to add a little bit of styling to our element.
.dig-pub--youtube {
    display: block;
    width: 100%;

    .youtube--frame {
        max-width: 100%;
        max-height: 100%;
    }
}
The YouTube element doesn't need much styling. We're using a combination of width and max-width: 100%; to let the YouTube frame not become bigger than the design layer. So, in a responsive layout, the frame would shrink accordingly when there is not enough space.
Data handling
Starting with the "SwagDigitalPublishing" version 1.2.0 we introduced a new way to handle your custom elements and their related data.
Each element has to be handled by a so-called ElementHandler now.
Those element handlers come in handy when you're trying to provide additional data to your own element without manipulating the original banner.
In case you're using a custom element without a matching ElementHandler, you'll face a new error saying Handler for element <name> not found.
In order to register a new ElementHandler for our custom element, we'll have to add a new subscriber to our plugin:
 <!-- Register ElementHandler -->
<service id="swag_digipub.subscriber.element" class="SwagDigitalPublishingSample\Subscriber\ElementHandler">
    <tag name="shopware.event_subscriber"/>
</service>
Now we'll have to create the new subscriber ElementHandler, which has to subscribe on a new event called Shopware_DigitalPublishing_Collect_ElementHandler.
This event is necessary to register our new ElementHandler, so our custom element YouTube can be properly handled.
<?php

namespace SwagDigitalPublishingSample\Subscriber;

use Doctrine\Common\Collections\ArrayCollection;
use Enlight\Event\SubscriberInterface;
use SwagDigitalPublishingSample\Components\YouTubeHandler;

class ElementHandler implements SubscriberInterface
{
    /**
     * @return array
     */
    public static function getSubscribedEvents()
    {
        return [
            'Shopware_DigitalPublishing_Collect_ElementHandler' => 'collectElementHandler'
        ];
    }

    /**
     * @return ArrayCollection
     */
    public function collectElementHandler()
    {
        return new ArrayCollection(
            [new YouTubeHandler()]
        );
    }
}
Since this is a collect event, we need to return an ArrayCollection containing our custom handler.
In this case we call it YouTubeHandler, since its only purpose is to handle the YouTube element.
Lastly, we need to implement the YouTubeHandler itself.
We will define the handler as a component, so it's placed in the following directory:
Components/YouTubeHandler.php
Our custom handler has to implement the interface PopulateElementHandlerInterface in order to be properly recognized.
The interface requires the two methods handle and canHandle.
The handle method provides additional data to our element, while the canHandle method decides if the given element is supported by this handler.
<?php

namespace SwagDigitalPublishingSample\Components;

use Shopware\Bundle\StoreFrontBundle\Struct\ShopContextInterface;
use SwagDigitalPublishing\Components\ElementHandler\PopulateElementHandlerInterface;

class YouTubeHandler implements PopulateElementHandlerInterface
{
    /**
     * Check if the given element can be handled by our ElementHandler.
     *
     * @param array $element
     *
     * @return boolean
     */
    public function canHandle(array $element)
    {
        return $element['name'] === 'youtube';
    }

    /**
     * @param array $element
     * @param ShopContextInterface $context
     *
     * @return array
     */
    public function handle(array $element, ShopContextInterface $context)
    {
        return $element;
    }
}
There's no need to provide additional data to our element in this case, so the handle-method will just return the element again.
Conclusion
In this article we learned how to create custom elements for the Digital Publishing module. All that we need is to add a new ExtJS handler and a frontend template. I hope you enjoyed the tutorial and that you will create amazing elements for this new kind of module. Feel free to give us some feedback in the forum.
Download
Sample Plugin: Download.