Getting started with Smarty
What is Smarty?
Smarty is a template engine for PHP, facilitating the separation of presentation (HTML/CSS) from application logic.
- www.smarty.net -
Smarty 3 is used as the template engine for all frontend logic in Shopware. You don't have to know much about PHP or accessing data from the system when it comes to building your own shop themes. While editing the frontend you can focus on HTML, CSS, JavaScript and of course a little bit of Smarty code.
The basics
Smarty uses a markup-like syntax which you may already know from HTML or XML. All Smarty tags and functions start with a left curly bracket { and end with a right curly bracket } like the <> in HTML. Files including Smarty code are called template files and use the .tpl extension. You can imagine them as normal HTML files which contain additional Smarty tags. The template engine will render these files and generate valid HTML from it. In the following example we define a simple tag.
Example: Simple Smarty tag
{s name="shopName"}DemoShop{/s}
In our example, we use the {s} tag, which is used to define text as a snippet and make it translatable. You can see that some Smarty tags wrap the content with a starting and a closing tag, like other markup languages do. They can also have different attributes, like the name="" of the snippet in our example.
So, in Smarty, we have different tags and actions we can use, along with our normal HTML code. But why do we need them? What can we do with them? Let's dive deeper.
Variables
To start with, we use Smarty to output the data we receive from the shop system. So every page which is rendered by the template engine is served with the necessary data to show the requested content. The data is stored in so called template variables. All template variables can be accessed via Smarty with a starting $ and the name of the variable.
Example: Variable output
<h2>{$sArticle.articleName}</h2>
This short example will output the content of the variable in a normal <h2> element. The dividing . in the variable name is used for accessing sub-values. As shown in this example, a template variable may not only be of a simple string or number type, but also of a large set of data, a so called array. In our example we have a template variable called sArticle, which is an array containing several fields, including the field name. Template variables can be nested even deeper. You may find something like {$sArticle.image.thumbnails[0].source} in our template code. All fields of an array can also be accessed with the [] syntax you may know from PHP.
Modifiers
Sometimes we not only want to simply output the content of a variable, but manipulate the values before they get rendered. This is where Smarty modifiers come in place. Modifiers are small functions you can apply to the template variables to modify the output.
Example: Applying a modifier to a variable
<div>
    {$sArticle.description|truncate:120}
</div>
As you can see, the modifier is applied by simply adding a | and the name of the modifier right after the variable name. In this example the truncate modifier is applied to the description, shortening the text to a given maximum number of characters. Parameters like the amount of 120 are added via : to the modifier.
You can also use more than one modifier on a variable by lining them up. They get applied in the order in which they are appended. For example if you want to remove the HTML tags from the description variable before truncating it, you put the according modifier right before the truncate modifier.
Example: Applying two modifiers
<div>
    {$sArticle.description|strip_tags|truncate:120}
</div>
Conditions
You might need to vary the output based on different decisions. To decide what is being rendered, you can do a check of a variable against a condition. A simple condition is defined by a starting {if} tag, which contains the check, and a closing {/if} tag. The content between these tags is only rendered when the check is true.
Example: Defining a condition
{if $sArticle.description}
    {$sArticle.description}
{else}
    {$sArticle.description_long|strip_tags|truncate:120}
{/if}
In the example, we define a simple condition which tests if the variable is defined. As you can see, the condition wraps an {else} tag, which renders a fallback content in case the given condition is not true. Conditions can be nested even deeper by adding additional checks with {elseif}. In our example, we do a very simple check, but you can use different operators to build more complex conditions. Here you can find a complete overview of possible operators.
Loops
To handle a larger set of data, like a list of products, we can create dynamic output by looping through the data. For example, you can iterate through an array which contains the data of several products and generate the content for each product automatically.
Example: Looping through an array
<ul>
    {foreach $sArticles as $item}
        <li>{$item.articleName}</li>
    {/foreach}
</ul>
The loop starts with a {foreach} tag and also ends with a closing {/foreach} tag. In the starting tag, we define the array we want to iterate through ($sArticles) and a name for the variable in which the single data set will be provided within the loop ($item). The template engine will now render the code between the {foreach} tags for every item in the array, providing the single item in a new variable. In our example we loop through the product data in $sArticles and generate a new list entry for each product containing the name of the product.
Official documentation
Of course there are many other things you can do with Smarty, but these basic features are the most common tools you will use in your everyday work. If you want to go a little further you can read the full Smarty 3 documentation here.
Template inheritance
To edit an existing template file in Shopware you do not have to copy the whole file or overwrite the core files. With the template inheritance system, you only have to edit the parts you really want to change. This has many advantages:
- not necessary to copy whole templates
- less code to write and to maintain
- your template is always update compatible
- your template can still be extended by plugins
Inherit a standard theme
We recommend to always use the inheritance system when creating custom themes
. It will save you a lot of time and work. With Shopware 5 we offer two standard themes you can build on. The most common case is to build on the new Shopware Responsive theme. It is a very modern, fully responsive theme, which implements all the amazing features of Shopware 5. You only have to do your design changes, without having to rebuild the whole functionality of the shop. If you want to go even deeper and build your own features from scratch, you can inherit the Shopware Bare theme, which only implements the basic HTML structure. To specify which theme you want to inherit, you add the corresponding name to the Theme.php of your own custom theme.
Example: Specify a parent theme in the Theme.php
class Theme extends \Shopware\Components\Theme
{
    protected $extend = 'Responsive';

    // ...
}
Inheritance and plugin templates
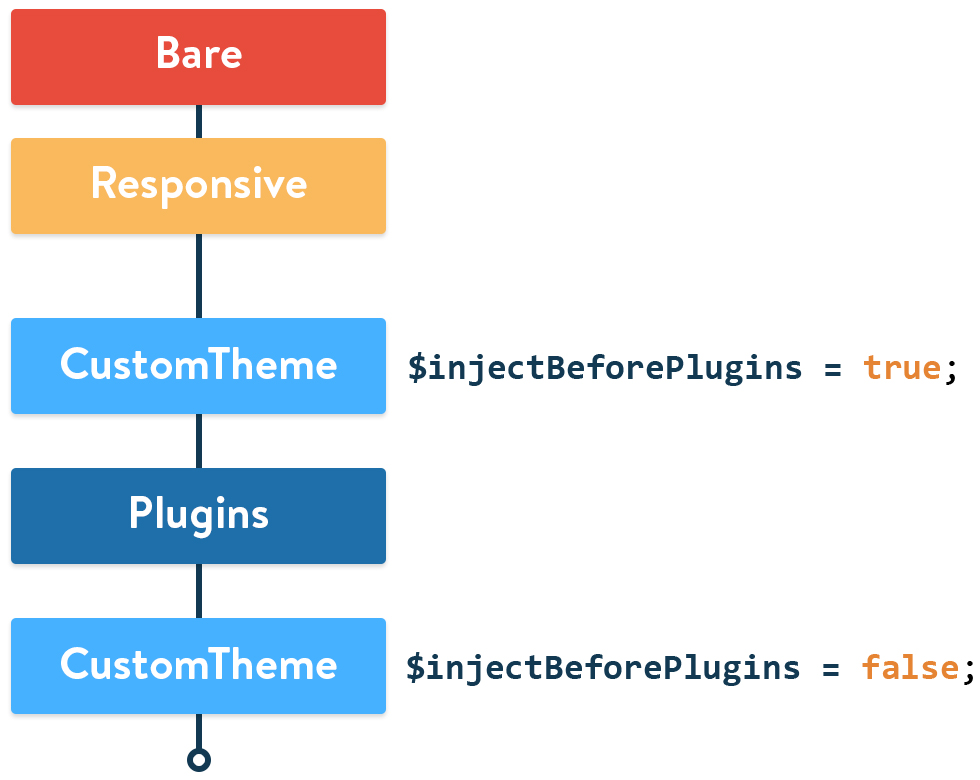 The plugins installed to your shop have a special position in the order of the inheritance system. All plugin templates are processed after the templates of the core themes. You can decide if your theme should be processed before or after the plugin templates by setting the
 $injectBeforePlugins variable in your Theme.php file. If you want to create a normal theme, which can be purchased in the shopware community store, the value should be set to true, so your theme is processed before the plugins. This ensures that all plugins can be used with your theme. When you want to make some local changes to specific plugins, you can set the value to false for extending the plugin templates.
class Theme extends \Shopware\Components\Theme
{
    protected $extend = 'Responsive';

    protected $name = 'CustomTheme';

    protected $injectBeforePlugins =  true;

    // ...
}
Overwriting template files
Shopware uses a fixed directory structure for all parts of the frontend, where each part has its own directory with its own template files. In each of these directories you will find an index.tpl file, which contains the base template for the whole part. When you defined a parent theme, you can overwrite the existing template files just by creating the same file in your own theme directory. For example, if you want to completely overwrite the product detail page, you can create the file with the corresponding directory structure frontend/detail/index.tpl in your own theme. Shopware will automatically detect the files you created and add them to the inheritance system.
Extending template files
In most cases you don't want to overwrite the whole template file, but only edit some parts of it. Therefore you can use the {extends} method of Smarty. Right at the top of your file you define the path to a template file you want to inherit.
Example: Extending a template file
{extends file="parent:frontend/detail/index.tpl"}
In the file="" attribute of the {extends} action you define the path starting from the root of the theme directory. The special parent: prefix tells Shopware to search for the file in the directory of the parent theme. This allows us to extend the templates of the defined parent theme.
An extended file cannot have its own HTML structure, because you have to tell the engine where to put your template code. Instead you're provided with all content blocks the parent file has defined.
Blocks
Smarty blocks are used for structuring template code in logical segments. These blocks can be accessed by other files to extend the template at a given point. To create a block in Smarty you use the {block} tag which defines its content as a new segment. Every block needs a name="" attribute to define a unique name for the segment. This name is used to access the block from other files via the inheritance system.
Example: Defining a content block in Smarty
{block name="frontend_index_logo"}

    <div class="logo--shop">
        //...
    </div>

{/block}
When you inherit a template file via the {extends} method, you're provided with all blocks from the parent file. These are your access points to make changes or add your additional code.
{block name="frontend_index_logo"}
    {$smarty.block.parent}

    <div class="shop--slogan">
        <h2>My shop is the best!</h2>
    </div>
{/block}
In the example above, we override the parent block and then call {$smarty.block.parent} to append our own code to on the frontend_index_logo block and add a slogan right after the shop logo. The original code stays unchanged while the new content for our slogan is placed right after it. To edit or extend existing templates you have to do the following steps:
- Find the block of the content you want to edit in the template file.
- Create the template file under the same structure in your own theme directory.
- Add the
{extend}tag at the beginning of your file and enter the path to the original file. - Define the
{block}from the original file to replace it. If you want to insert your content before or after the content of the parent block, use{$smarty.block.parent}before or after your own code to add new content.
Register custom Smarty plugins
In Shopware 5 we added the ability to register your own custom Smarty plugins in your theme. This enables you to create new modifiers and Smarty functions. To register a new Smarty plugin just create the necessary directory structure in your theme directory. If you want to learn more about writing Smarty plugins you can see the official guide.
Example: Path to custom Smarty plugins
themes/Frontend/ThemeName/_private/smarty/function.markdown.php
themes/Frontend/ThemeName/_private/smarty/modifier.picture.php
Notice: Smarty plugins are not working inside mail templates
Register custom smarty plugins in a Shopware plugin
To specify your custom smarty plugin directory inside your Shopware plugin you can use the CompilerPass to add your own directory:
<?php
namespace PluginName\Components\CompilerPass;

use Symfony\Component\DependencyInjection\Compiler\CompilerPassInterface;
use Symfony\Component\DependencyInjection\ContainerBuilder;
/**
 * Class AddTemplatePluginDirCompilerPass
 */
class AddTemplatePluginDirCompilerPass implements CompilerPassInterface
{
    /**
     * You can modify the container here before it is dumped to PHP code.
     *
     * @param ContainerBuilder $container
     */
    public function process(ContainerBuilder $container)
    {
        $template = $container->getDefinition('template');
        $template->addMethodCall('addPluginsDir', ['directory/name']);
    }
}
Register CompilerPass class in build method in plugin boostrap class:
/**
 * @param ContainerBuilder $container
 */
public function build(ContainerBuilder $container)
{
    parent::build($container);

    $container->addCompilerPass(new AddTemplatePluginDirCompilerPass());
}