
Securing web servers properly is a must for customers and hosters. The more complex the setup becomes the more consideration is required in order to e.g. debug a customer's development system. In this blog post I will show, how you can SSH to a server which is only reachable by a so called "jump server".
Preface
In the following description I will assume, that you have set up ssh-agent properly. Please also notice, that using
ssh-agent does have security implications, so you should at least use ssh-agent -c in order to be informed about
authentication attempts.
The setup
The customer (green) has multiple servers in his environment. Only the jump server is reachable through SSH all other servers are protected by the firewall:
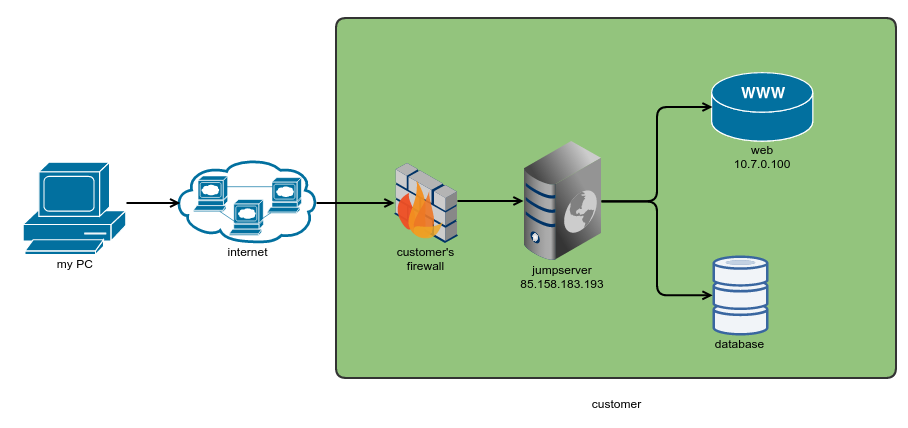
The customers got my public key file beforehands and deployed it to the jump server as well as to the web server. In order to debug the web server, I first need to connect to the jump server:
daniel@localhost: ssh -A user@85.158.183.193
From the jump server I can then connect to the web server:
user@85.158.183.193: ssh user@10.7.0.100
The "magic" here comes from the -A ssh option. It allows me to authenticate against the web server, even without having
stored my private key file on the jump server. Technically it forwards the authentication agent connection (see preface)
Now finally I am on the web server and can start debugging. Most probably there is not even vim available - is this going
to become a nano nightmare?
SSH proxy command
Luckily this can be solved using a combination of SSH forwarding and SSH proxy commands. First of all let's configure the ssh config file:
# ~/.ssh/config
Host jumpserver-customer1
    HostName 58.158.183.193
    ForwardAgent yes
    User user
Host webserver-customer1
    HostName 10.7.0.100
    User user
    ProxyCommand ssh jumpserver-customer1 netcat -w 120 %h %p
This configuration defines two hosts: jumpserver-customer1 is the jump server. It has three configs:
ForwardAgent yesis basically the pendant to the-ASSH option from above.User userwill define, that I want to login with the user nameuser.HostName 58.158.183.193is the IP of that host (see above)
webserver-customer1 has the following config:
HostName 10.7.0.100: IP of the hostUser user: Definition of the usernameProxyCommand ssh jumpserver-customer1 netcat -w 120 %h %p: Our jump host magic
The ProxyCommand basically allows you to specify a proxy for your connection - so this command is executed in order
to perform the actual connection to the web server. The syntax is quite easy:
ssh jumpserver-customer1: ssh tojumpserver-customer1netcat -w 120 %h %p: This command is executed on the jump host.%his the IP of the current host (in this case: web server) and the corresponding port.-w 120defines a timeout of 120 seconds.
This will now allow me to run ssh webserver-customer1 on my local machine. Because of the ProxyCommand instruction SSH will then connect
to the jumpserver-customer1 host first and connect to the web server from there. Furthermore it will create a connection
from the jump server to the web server using netcat - so it will basically pipe all input / output between those two
host (thus the jump server will be used as a proxy).
Setting it up with PHPStorm
Theoretically we are done - we have a direct connection from our local machine to the web server using the jump host as
a proxy. But how can this be hooked up with e.g. PHPStorm? In my example I decided to bind that connection to a local
port using the command ssh appserver-customer1 -L 2000:localhost:22 -N. It uses the same mechanics as above but
binds port 20 of the remote connection to my local port 2000. So if I ssh to localhost:2000 I will actually connect
to the web server of the customer.
It is easy to configure that with PHPStorm:
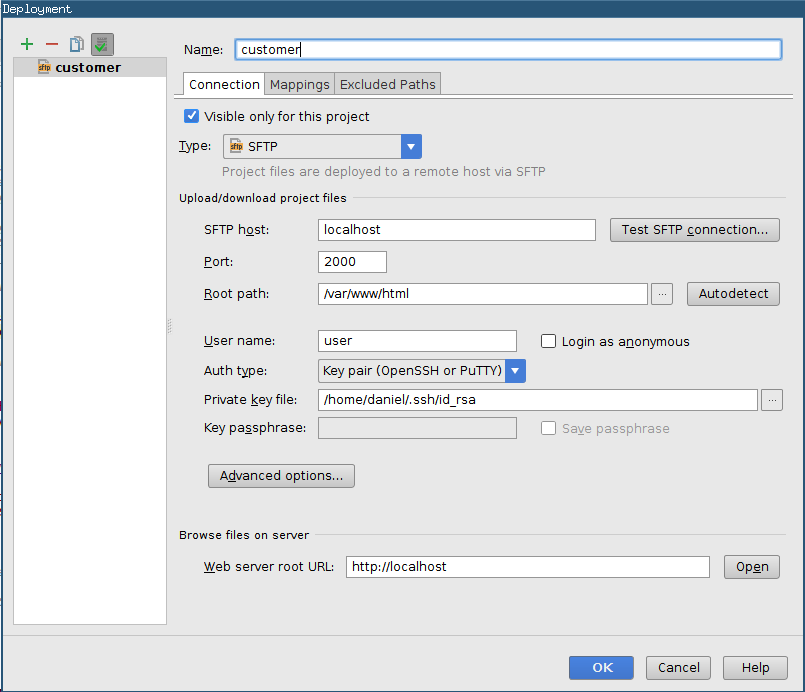
This config will instruct PHPStorm to connect to localhost:2000 (and therefore to the customer's webserver) using
my private key file, username user and the SFTP protocol.
Once the connection is established, I can download the remote sources, upload changed files etc.