
The shopping worlds (also called emotions) are one of the central content pages in Shopware. With them, even non-technical persons can create landing pages, product, category or blog teasers and many other content types. In addition to that there is the easy to use editor, powerful components and extensibility, of course.
There are cases, however, where you might want to use the shopping worlds for other kind of content pages - or where you don't want to create one shopping world per page - but one "template" shopping world, that is dynamically populated. The following blog post will discuss this exact scenario.
The goal
 In my example there will be a new "store manager" backend module. It will allow the user to define stores (name, description,
address, opening times). In addition to that, the "store manager" will allow the user to edit a shopping world template -
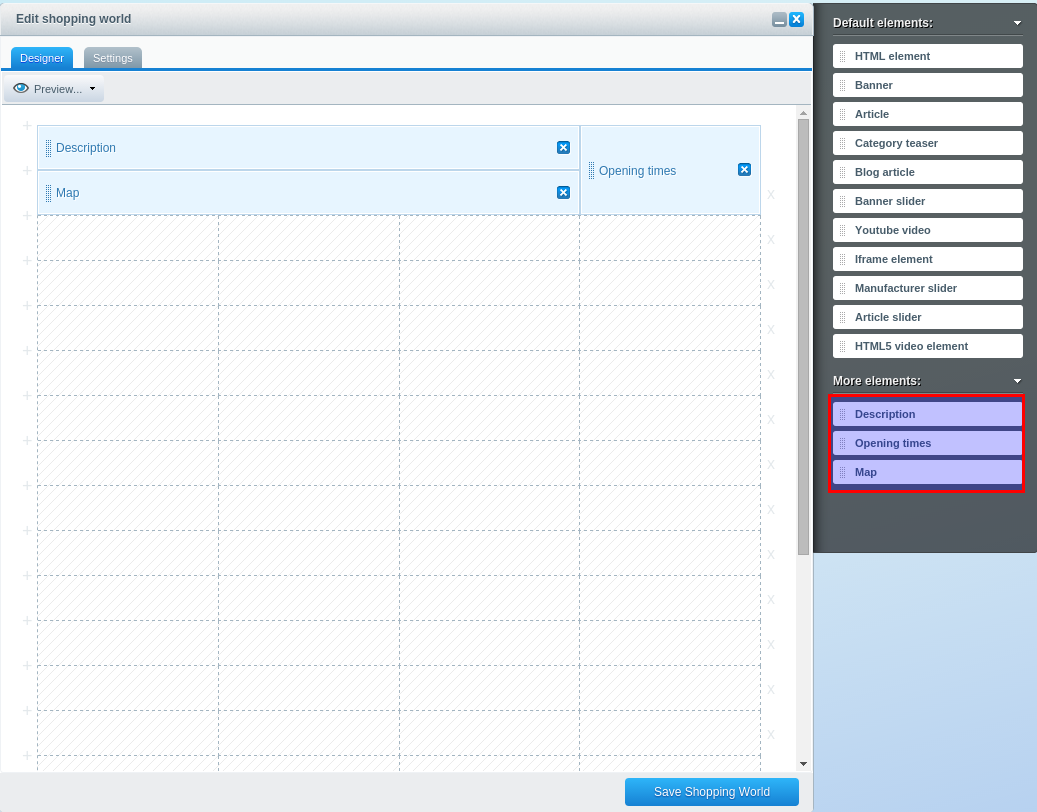
which is used for all stores. So the user can arrange name, description, google map and opening times.
In my example there will be a new "store manager" backend module. It will allow the user to define stores (name, description,
address, opening times). In addition to that, the "store manager" will allow the user to edit a shopping world template -
which is used for all stores. So the user can arrange name, description, google map and opening times.
In order not to bloat the shopping world module, the "store template" shopping world should not be visible there. Same applies to our store shopping world components: they should only be visible in the store manager - not in the default shopping world module.
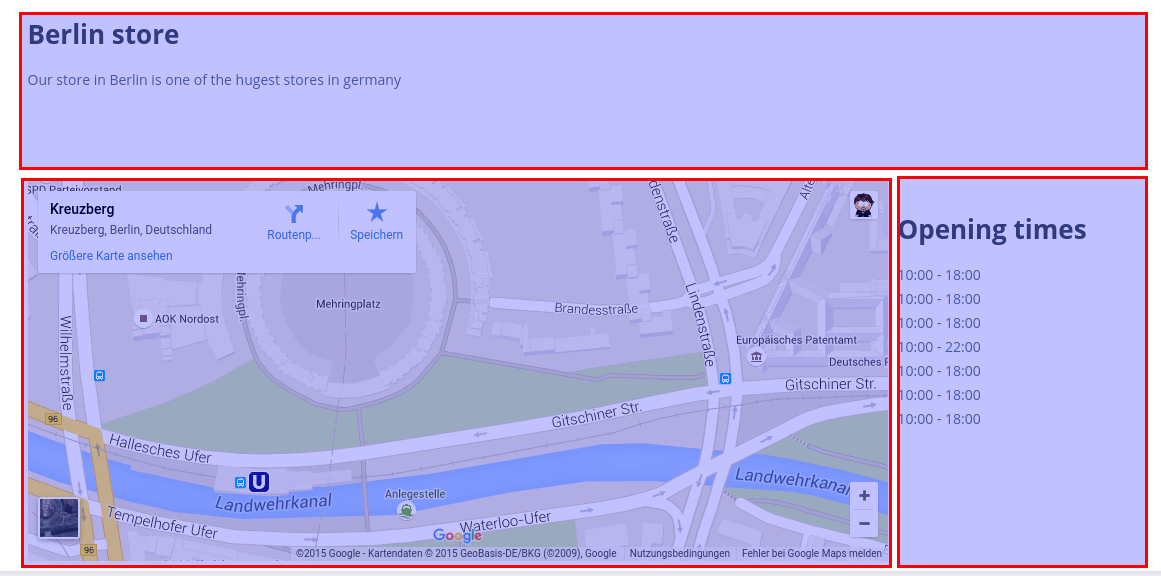 On the image on the left you can see the frontend result. It is a simple store page, which shows some details for a given
store - in this example name, description, google map and opening times can be seen.
On the image on the left you can see the frontend result. It is a simple store page, which shows some details for a given
store - in this example name, description, google map and opening times can be seen.
The marked blocks are completely independent. By modifying the "store template" shopping world, the user can easily move those boxes around.
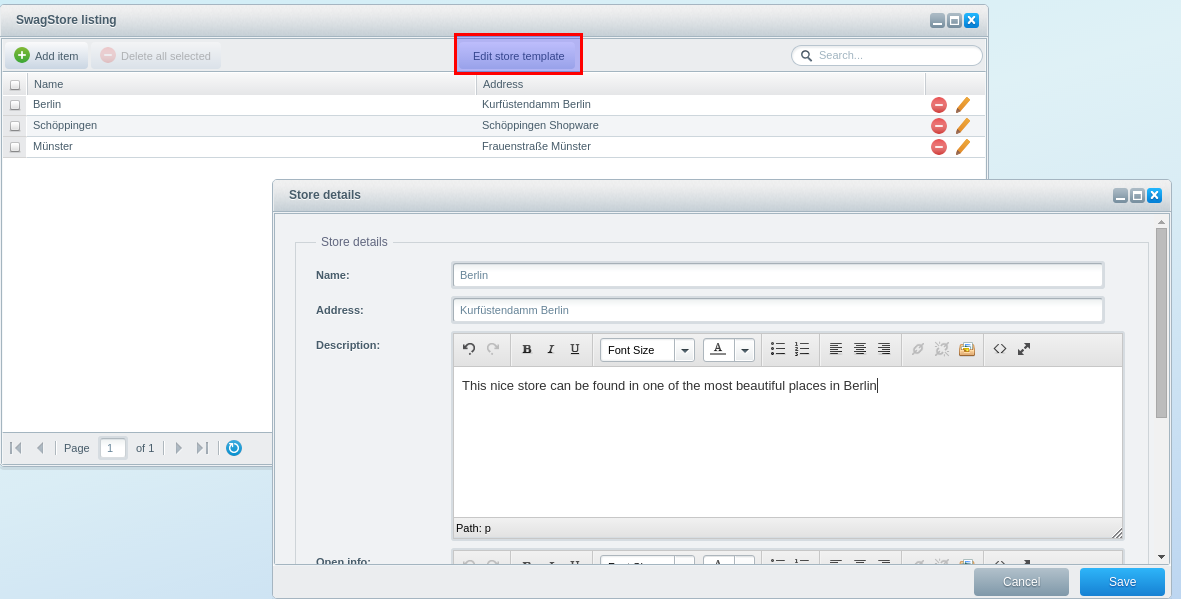
 The backend module is a simple CRUD module, that allows the user to create / edit stores. In our case stores in Berlin,
Schöppingen and Münster have been defined. As the Shopware backend components were used, this module is quite simple to
create - the only special thing is the "edit store template" button in the list window. This will open up the template
shopping world that defines the layout for all stores. As mentioned before, this specific shopping world can only
be opened from the "store manager" module, the highlights components will also only be visible there.
The backend module is a simple CRUD module, that allows the user to create / edit stores. In our case stores in Berlin,
Schöppingen and Münster have been defined. As the Shopware backend components were used, this module is quite simple to
create - the only special thing is the "edit store template" button in the list window. This will open up the template
shopping world that defines the layout for all stores. As mentioned before, this specific shopping world can only
be opened from the "store manager" module, the highlights components will also only be visible there.
Tasks
Looking at the goal, the plugin can roughly be split into the following tasks:
- Shopping world
- Create a "store template" shopping world
- Create new shopping world components, that can be filled dynamically (e.g. description, map, opening times)
- hide those components and the "store template" from the default shopping world module
- Frontend
- new "store" controller
- store selector template (combobox)
- include the "store template" shopping world for the current store
- wiring up the custom shopping world component
- Store manager backend module
- CRUD for store infos
- add "open store template" button, which opens the store template shopping world
I will quickly show the more interesting parts of this plugin - if you want to have the full example, please see the download section below.
Shopping world
Create a "store template" shopping world during plugin install
The store template shopping world can easily be created using the Emotion Doctrine model. The only special thing is the
attribute swagShopTemplate that I use to tell my "store template" apart from all the other shopping worlds.
Shopware()->Models()->addAttribute(
    's_emotion_attributes',
    'swag',
    'shop_template',
    'INT(1)'
);
Shopware()->Models()->generateAttributeModels(
    [
        's_emotion_attributes'
    ]
);
Shopping world components
As the shopping world components are intended to be dynamic, there is not much configuration needed:
private function createMyEmotionComponent()
{
    $descriptionComponent = $this->bootstrap->createEmotionComponent(
        array(
            'name' => 'Description',
            'template' => 'component_description',
            'cls' => 'dynamic_emotion_description',
            'description' => 'Shop description - will show the shop\'s description'
        )
    );
    $openInfoComponent = $this->bootstrap->createEmotionComponent(
        array(
            'name' => 'Opening times',
            'template' => 'component_opening',
            'cls' => 'dynamic_emotion_opening_times',
            'description' => 'Shop opening times'
        )
    );
    $mapComponent = $this->bootstrap->createEmotionComponent(
        [
            'name' => 'Map',
            'template' => 'component_map',
            'cls' => 'dynamic_emotion_map',
            'description' => 'Shop a google map link'
        ]
    );
    $mapComponent->createNumberField(
        [
            'name' => 'zoom',
            'defaultValue' => '17',
            'minValue' => 1,
            'maxValue' => 21,
            'position' => 1
        ]
    );


    return [$openInfoComponent, $mapComponent, $descriptionComponent];

}
As you can see, this create the components description, opening times and map. Only the map components has a
configuration field - for the zoom factor. The rest of the data will be read dynamically depending on the current store
selection.
Hide all this from the shopping world module
In order not to bloat the shopping world module, my "store template" and the "store components" should not be seen in the default module.
To do so, a simple subscriber is implemented:
{
    public static function getSubscribedEvents()
    {
        return array(
            'Enlight_Controller_Action_PostDispatchSecure_Backend_Emotion' => 'modifyEmotionModule',
            'Shopware\Models\Emotion\Repository::getListingQuery::after' => 'removeStoreTemplateEmotionFromListing'
        );
    }

    // do not show the store template shopping world in the emotion module
    public function removeStoreTemplateEmotionFromListing(\Enlight_Hook_HookArgs $args)
    {
        $builder = $args->getReturn();

        $builder->leftJoin('emotions', 's_emotion_attributes', 'attribute', 'attribute.emotionID = emotions.id')
            ->andWhere('attribute.swag_shop_template IS NULL or attribute.swag_shop_template != 1');

        return $builder;

    }

    public function modifyEmotionModule(\Enlight_Event_EventArgs $args)
    {
        /** @var $controller \Enlight_Controller_Action */
        $controller = $args->get('subject');
        $request = $controller->Request();
        $view = $controller->View();

        // remove our components from the default emotion library
        // our components should just be visible when editing our store emotion template
        if ($request->getActionName() == 'library' && !$request->has('showStoreComponents')) {
            /** @var CustomComponents $customComponents */
            $customComponents = $controller->get('swag_dynamic_emotion.custom_components');

            $data = $view->getAssign('data');
            foreach ($data as $key => $component) {
                // remove the custom elements from the default emotion module
                if ($customComponents->isCustomComponents($component['cls'])) {
                    unset($data[$key]);
                }
            }
            $view->assign('data', $data);
        }

    }
}
The method removeStoreTemplateEmotionFromListing will check for a custom attribute the plugin created. This attribute
is 1 for the store template shopping world, so only shopping worlds without this flag are shown.
The method modifyEmotionModule modifies the libraryAction of the backend emotion controller - this method will
return all available components for the toolbar on the right of the emotion designer. As our dynamic components
should not be visible there, they are hidden by default using a simple service called swag_dynamic_emotion.custom_components.
This services basically "knows" all emotion components of this plugin - and allows checking, if a given component
is one of the plugin's components.
Frontend
Store controller
The store controller and the associated frontend template is quite simple:
class Shopware_Controllers_Frontend_Store extends Enlight_Controller_Action
{
    public function indexAction()
    {
        /** @var Repository $repo */
        $repo = Shopware()->Models()->getRepository('Shopware\CustomModels\SwagDynamicEmotion\Store');
        $stores = $repo->findAll();

        // all stores
        $this->View()->assign('stores', $stores);

        // curent store or null
        $this->View()->assign(
            'currentStore',
            $this->Request()->getParam('store', empty($stores) ? null : $stores[0]->getId())
        );

        // store template emotion id
        $this->View()->assign('storeEmotionId', $repo->getStoreEmotionId());
    }
}
The controller will basically read all stores from the database and assign them to the template. Additionally it
checks for the parameter store (which is the currently selected store) and assigns it to the variable currentStore.
Last of all, it assigns the id of the store template shopping world to the template, so it can be included there.
In this example, Doctrine ORM is used and all store entities are fetched. Depending on the number of entities and
the server load, pagination and perhaps custom SQL queries might be more suitable for your.
The template
The only frontend template needed can be found in SwagDynamicEmotion/Views/frontend/store/index.tpl.
{extends file="parent:frontend/index/index.tpl"}

{* Hide the left navigation bar*}
{block name='frontend_index_content_left'}
{/block}

{block name='frontend_index_content'}
    <div class="content content--home">


        <form>
            <select name="store" id="storeSelector" onchange="this.form.submit()">
                {foreach from=$stores item=store}
                    <option value="{$store->getId()}" {if $currentStore eq $store->getId()}selected="selected"{/if}>{$store->getName()}</option>
                {/foreach}
            </select>
        </form>

        <br>
        <div class="content--emotions">
            {action controller=Emotion module=Widgets emotionId={$storeEmotionId} currentStore={$currentStore}}
        </div>
    </div>
{/block}
It hides the left navigation menu (frontend_index_content_left) and shows a store selector select box - no rocket
science. The only interesting part here is the inclusion of the store template shopping world:
{action controller=Emotion module=Widgets emotionId={$storeEmotionId} currentStore={$currentStore}}
It uses the two parameters $storeEmotionId (which identifies the shopping world to show)
and $currentStore (which will later be used to populate the shopping world with the correct store data).
Both have been assigned in the controller before.
Wiring up the custom shopping world component
In order to support our new, custom emotion components and fill them dynamically with the current store's content, we will
need to subscribe to the Shopware_Controllers_Widgets_Emotion_AddElement event, which is useful to provide data
for custom components:
class Emotion implements \Enlight\Event\SubscriberInterface
{
    public static function getSubscribedEvents()
    {
        return array(
            'Shopware_Controllers_Widgets_Emotion_AddElement' => 'handleElement',
            // … the other events we discussed before
        );
    }

    public function removeShopTemplateEmotionFromListing(\Enlight_Hook_HookArgs $args) { }

    public function modifyEmotionModule(\Enlight_Event_EventArgs $args) { }

    /**
     * handle the custom emotion components and provide the current store's content
     *
     * @param \Enlight_Event_EventArgs $args
     * @return array|mixed
     */
    public function handleElement(\Enlight_Event_EventArgs $args)
    {
        /** @var $controller \Enlight_Controller_Action */
        $controller = $args->get('subject');
        /** @var CustomComponents $customComponents */
        $customComponents = $controller->get('swag_dynamic_emotion.custom_components');

        $element = $args->get('element');
        $data = $args->getReturn();
        $storeId = $controller->Request()->getParam('currentStore');

        // just modify our own components
        if (!$customComponents->isCustomComponents($element['component']['cls'])) {
            return $data;
        }

        // if no $storeId is available (e.g. shopping world preview), get a fallback
        $storeId = isset($storeId) ? $storeId : Shopware()->Db()->fetchOne('SELECT id FROM swag_store LIMIT 1');

        // if still not available (e.g. no stores) - return
        if (!$storeId) {
            return $data;
        }

        /** @var ModelRepository $storeRepo */
        $storeRepo = Shopware()->Models()->getRepository('Shopware\CustomModels\SwagDynamicEmotion\Store');
        return array_merge($data, ['store' => $storeRepo->find($storeId)]);
    }

}
As you can see, the service swag_dynamic_emotion.custom_components is used here again, to tell apart the default
components from our own ones. If no storeId is available (e.g. for the store listing page or the emotion preview
in the backend) a default is used:
$storeId = isset($storeId) ? $storeId : Shopware()->Db()->fetchOne('SELECT id FROM swag_store LIMIT 1');
Then, finally, we return all the data for our component:
/** @var ModelRepository $storeRepo */
$storeRepo = Shopware()->Models()->getRepository('Shopware\CustomModels\SwagDynamicEmotion\Store');
return array_merge($data, ['store' => $storeRepo->find($storeId)]);
Merging the result array is necessary, as $data might contain the components data, e.g. zoom for the map component.
We add the current store's data to it, so both are available in the emotion template.
Store manager backend module
The store manager backend module was created using Shopware's backend components and generated using the code generator. So there is nothing special here - except the "edit store template" button, which is supposed to open the template shopping world directly.
Open store template shopping world
In order to add this functionality, we need to modify the swag_store/view/list/list.js file of our backend:
Ext.define('Shopware.apps.SwagStore.view.list.List', {
    extend: 'Shopware.grid.Panel',
    alias: 'widget.swag-store-listing-grid',
    region: 'center',

    configure: function () {
        return {
            detailWindow: 'Shopware.apps.SwagStore.view.detail.Window',
            columns: {
                name: undefined,
                address: undefined
            }
        };
    },

    createToolbarItems: function () {
        var me = this,
            items = me.callParent(arguments);

        items.splice(3, 0, Ext.create('Ext.button.Button', {
            text: 'Edit store template',
            handler: function () {
                Shopware.app.Application.addSubApplication({
                    name: 'Shopware.apps.Emotion',
                    params: {
                        // the ID has been assigned in our backend controller
                        emotionId: '{$storeTemplateEmotionId}'
                    }
                })
            }
        }));
        items.splice(4, 0, '->');

        return items;
    }
});
As you can see above, the function createToolbarItems is an override of the base class Shopware.grid.Panel.
The override is used to add the new button. The handler callback of the button will just open the emotion detail
view for the provided emotionId. The ID {$storeTemplateEmotionId} will be filled by Smarty. In order to do so, I
extended the backend controller like this:
public function loadAction()
{
    parent::loadAction();
    /** @var Repository $repo */
    $repo = Shopware()->Models()->getRepository('Shopware\CustomModels\SwagDynamicEmotion\Store');
    // this will make our emotion id available in the (smarty) template of our backend application
    $this->View()->assign('storeTemplateEmotionId', $repo->getStoreEmotionId());
}
This pattern is usually discouraged in Shopware, as the templates are cached and side effects might occur. In this case,
however, the emotionId will be constant, so we can use it in this case. In order to query more dynamic information, models
or Ext.Ajax queries would be required.
Modifications to the shopping world module
The shopping world module is not able to open shopping world detail pages by default. As such, it needs to be extended
as well. In order to do so, I created the template file backend/swag_emotion/controller/main.js, which will extend the
main controller of the shopping world module:
//{block name="backend/emotion/controller/main"}
// {$smarty.block.parent}
Ext.define('Shopware.apps.SwagEmotion.controller.Main', {
    override: 'Shopware.apps.Emotion.controller.Main',

    init: function() {
        var me = this;

        me.callParent(arguments);

        if (me.subApplication.params && me.subApplication.params.emotionId > 0) {
            me.mainWindow.hide();
            me.getStore('Library').getProxy().extraParams.showStoreComponents = true;
            me.getController('Detail').loadEmotionRecord(me.subApplication.params.emotionId, function(record) {
                me.getController('Detail').openDetailWindow(record);
            });
        }
    }
});
//{/block}
This is an Ext override, that will modify the constructor of the controller. After calling the original method,
we add a check for a passed emotionId. If it was passed, the main shopping world listing window is hidden using
me.mainWindow.hide();. We also add the flag showStoreComponents to the library store, so that our custom components
will be shown in the designer (see our modification to the libraryAction).
Then finally we will open the detail page for the given emotionId using the call
me.getController('Detail').loadEmotionRecord(me.subApplication.params.emotionId, function(record) {
    me.getController('Detail').openDetailWindow(record);
});
Round up
With the modifications described above, we created a custom content designer that makes use of the shopping world module without bloating the original module. This will allow the users to use the powerful shopping world designer for custom content pages in a very convenient way. In addition to that, we wrote "dynamic" shopping world components, that will be filled depending on the currently selected store. This way of using the shopping worlds makes them even more powerful.
Download
I didn't go into detail about some smaller modifications and classes the plugin implements. For the full example, please download the plugin.